
This ultraportable telescope is ideal for outings in which stargazing is a “maybe” instead of a “definitely.”
Although I have a house full of telescopes, I still find myself dreaming up new ones that would be ideal for this or that situation. But that’s one of the real joys of learning to make telescopes — you can build instruments uniquely suited to a given application, limited only by your budget, skill, and imagination.
When I decided that it would be handy to have some kind of airline-portable travelscope, I built the carryon 8-inch described here. But occasionally I would be packing for a trip that didn’t have stargazing as a definite part of the plan, but merely a possibility. It didn’t seem to make sense to use my entire carryon allotment or a lot of precious trunk space for my 8-inch when it might not get used. What I needed was something that could be squeezed into a small package yet still offered rewarding views of the night sky.
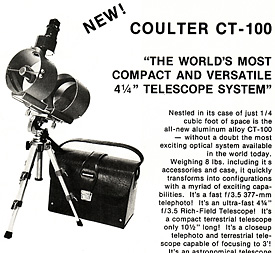
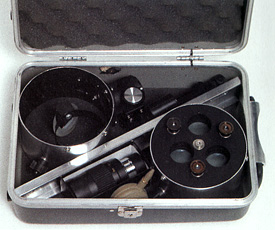
I chanced upon the ideal solution while leafing through back issues of Sky&Telescope magazine. In the October 1978 issue I found an advertisement for exactly what I needed — a Coulter Optical CT-100 4¼-inch compact Newtonian reflector. The only problem was that the company stopped producing these scopes in the early 1980s, shortly after they began making the Dobsonians that the Coulter name eventually became synonymous with. No problem, I thought, I’ll just make my own version of the CT-100.
A Telescope Conversion
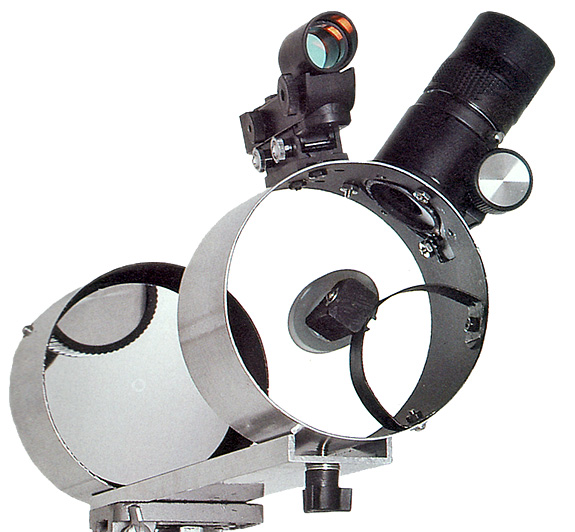
As the illustration above shows, the CT-100 was a bare-bones rich-field telescope. The clever part of the design was recognizing that most of a normal telescope’s tube did nothing more than join the front of the scope to the back. The CT-100 consisted of two short tube segments (a front assembly with the focuser, finder, and secondary mirror, and a rear section that housed the primary mirror and its adjustable cell) joined by a single rigid strut.
But choosing a design is one thing — rounding up the optics and other parts is another. As fate would have it, around the time I was working on this telescope, I picked up one of Orion Telescopes & Binoculars’ 4½-inch f/4 StarBlast altazimuth reflectors. After playing with it for a while, it occurred to me that this scope had everything I needed for my minimalist scope. It was all there: a lightweight plastic focuser, diagonal mirror, a short-focus primary mirror, and even a unit-power red-dot finder. If I had purchased all these parts separately, I would have paid more than I did for the compete StarBlast, so I didn’t feel too bad when I started disassembling the little scope.
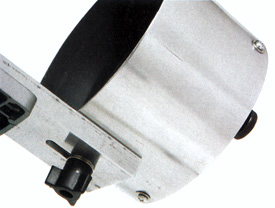
I began construction by cutting two 3-inch lengths of thin-walled 5-inch-diameter aluminum irrigation pipe that I had left over from another project. New tubing can be purchased from Hastings Irrigation, but cardboard or PVC pipe would likely work too. I cut the aluminum tubing to length with a jigsaw. Next, I used a hole saw to cut the focuser hole, and a hand drill for the holes needed for the secondary-mirror holder, finder, and primary-mirror cell. Last, I drilled and tapped a single ¼-20 hole in each tube segment for bolts that would allow attachment to the strut. These holes were positioned 1 inch from the back of the focuser segment, and 1 inch from the front of the primary mirror section. Later, I would screw 1-inch-long ¼-20 bolts through these from the inside.
To give the tube segments a finished appearance, I consulted fellow ATM Gary Wolanski — someone gifted at making raw aluminum look like chromed steel — who advised burnishing the aluminum with steel wool dipped in paint thinner, followed by a session with a soft cloth and automotive rubbing compound. This gave the tubes a pleasing, brushed-aluminum look. I completed the two pieces with a coat of Krylon Ultra-Flat black paint applied to the inside.
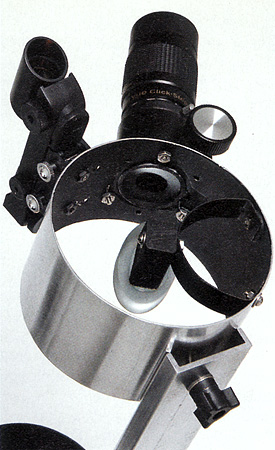
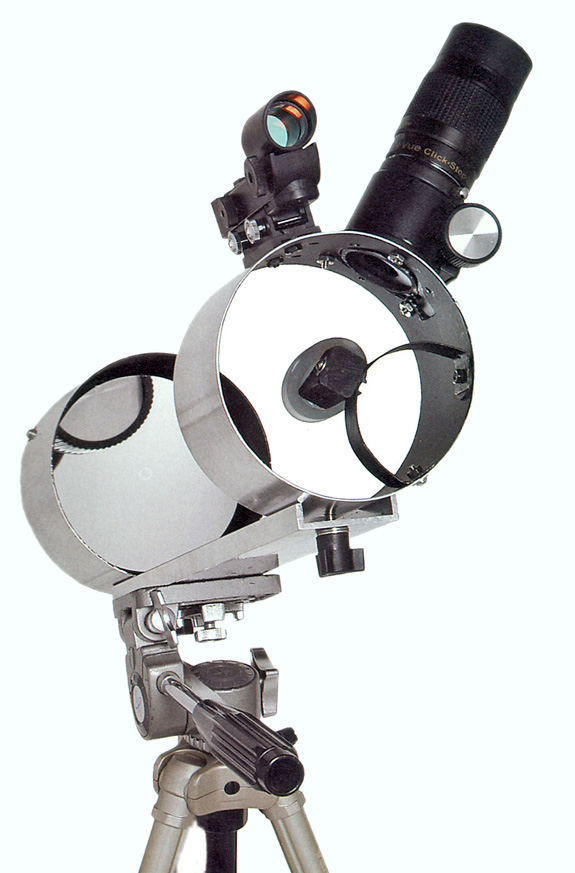
The secondary-mirror holder is a simplified version of the curved-vane spider design I describe here. I simply attached the secondary with silicone adhesive to a length of ½-inch by ½-inch wood that had one face cut to 45°. A screw passes through this piece and joins it to the curved spider vane. This simplified arrangement allows for tilt adjustment only, so correct placement of the spider within the tube is more critical than for the more complex holders I usually build.
The primary mirror was also attached with silicone adhesive to a double-plate mirror cell, again like the one shown here. I sized the tube plate to match the inside diameter of the rear tube segment. Three screws pass through the aluminum tube into the tube plate to hold it securely in place.
The last piece of the puzzle was the aluminum strut. I used a 14-inch length of ½-by-2-inch aluminum channel purchased from Shapiro Supply. A pair of 5/16-inch holes were drilled 1 inch from each end to accept the bolts from the tube segments. I gave the strut was a polished finish employing the same method used for the tube segments.
Finishing Touches
To make this telescope more versatile and perform better, I soon made a couple of changes. First, I cut ½ inch off the focuser drawtube so that it wouldn’t project into the light path when racked most of the way in. This meant that the focuser had less than an inch of travel. To give the scope more focusing range, I changed the strut’s mounting hole for the primary mirror assembly to a 1-inch-long slot. This way I could rough-focus the scope by sliding the primary mirror along the strut.
A second, more important modification was the addition of an annular focuser baffle to prevent stray light from sneaking past the upper tube section and flooding the focal plane. Although it is possible to calculate the baffle size, I took the easy way out and simply held a ruler to the bottom of the focuser barrel and judged how wide the baffle would have to be to allow me to see the whole secondary mirror, plus a little extra. This turned out to be an opening of ¾ inch with my scope. I used thin black plastic for the baffle, but black construction paper would work too, though it would be less durable.
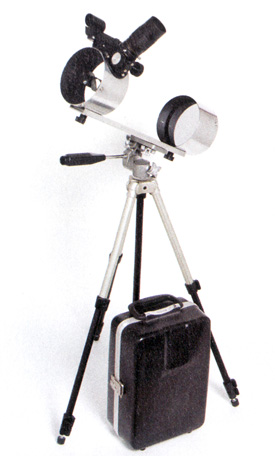
The completed scope makes a wonderful travel companion that weighs less than three pounds. In use, it sits comfortably atop my camera tripod, which really doesn’t count as additional weight in the suitcase since I take it with me even when I travel without a telescope. I usually pack the scope with a single eyepiece: my 8-to-24-mm zoom. This provides magnifications of 19× to 56×, a good range for most viewing. I’ve found that 56× is near the useful limit for a telescope mounted on a camera tripod anyway. More magnification would require a steadier (and heavier) mount with fine-motion controls.
And the views? Wonderful. In spite of its minimalist configuration, the scope delivers everything that a Newtonian of this size and focal length is capable of. I get stunning wide-field views of the Milky Way and even enjoy pleasing views of the Moon and planets. It’s a worthwhile addition to my ever-expanding telescope collection.
Three pounds of telescope plus one pound of tripod equals tons of observing enjoyment . . . or so the ad copy might go if this were a product for sale instead of a homebrewed telescope.
I eventually gave this scope away to a friend who continues to use it to this day. Since I built it, new options for the optics and tube fittings have become available. Orion now sells the StarBlast as an optical tube only for $150 — about $50 less than the standard version. And if you really want to keep costs down, their $110 SkyScanner 100mm table-top reflector is another option, albeit with optics that aren’t quite as high-quality as those in the StarBlast. Still, this minimalist scope isn’t really a high-power setup, so the difference is probably not going to materially affect your enjoyment of the night sky.
Did you find this article interesting or helpful? If so, consider using this link the next time you shop at Amazon.com. Better yet, bookmark it for future use. Thanks to Amazon’s associates program, doing so costs you nothing yet helps keep this site up and running. Thanks!
(This article is an updated version of one that appeared in the December 2003 issue of S&T.)