
Solving the thermal management puzzle can be as simple as adding a fan to cool your telescope’s primary mirror.
In Part 1 I described the cause and consequences of telescope thermals, now let’s see what can be done to cure, or minimize the problem.
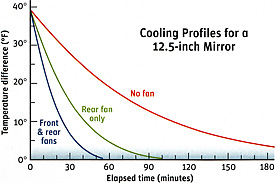
To begin, it’s important to recognize that there are two factors that determine the severity of your Newtonian reflector’s thermal problems. First is the temperature difference between its primary mirror (previously referred to as the “heat battery”) and the ambient air temperature — the greater the difference (the “Delta T”), the more severe the image degradation and the longer the effects will persist.
There’s a subtle aspect to Delta T that leads to a common misunderstanding. I’ve often heard telescope users say that they don’t worry about thermals in summer. They probably should. It’s not the absolute air temperature that matters, it’s all about the Delta T. In other words, if it’s a 70° F (21° C) summer’s evening, but your mirror is sitting at 78° F, the image degradation is the same as on a winter’s night when the ambient air temperature is 32° F and your mirror is at 40° F — a Delta T of 8° F is a Delta T of 8° F.
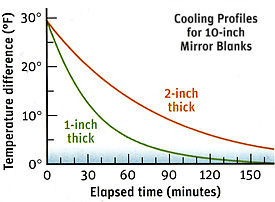
S&T graph. Data provided by Bryan Greer.
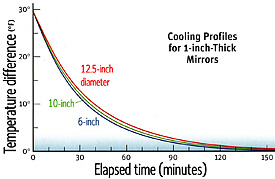
S&T graph. Data provided by Bryan Greer.
The second factor that determines how long it will take for your mirror to cool is its thickness. As Bryan Greer demonstrated with his testing (reported in the May and June 2004 issues of Sky & Telescope), the diameter of the mirror doesn’t really matter — its heat capacity is almost entirely due to its thickness. This makes sense when you consider that a mirror’s ability to shed heat depends on its total surface area, and as the mirror’s diameter increases, so does its surface area.
Regardless of your mirror’s dimensions, to successfully beat the heat, you have to keep Delta T to a minimum.
An Ounce of Prevention
In practice, taking care of your telescope’s thermals requires you to achieve two goals. The first is to cool the mirror so that it’s within 5½°F (3°C) of the ambient air temperature. The second is to keep it within that range as the air temperature drops throughout the night.
A good place to begin is by minimizing the starting Delta T. This is why it’s best to store your telescope outdoors (and in the shade), rather than in your living room. Failing that, put the telescope outside as soon as you can before using it. You may have heard that after an hour or so, the telescope will be sufficiently cooled. However, except under a very narrow set of conditions, this measure alone won’t be enough. Why not? Because the air temperature in most locations falls all night long and doesn’t bottom out until dawn. (The exception is when it’s cloudy, which obviously doesn’t help us here.) In other words, even in the unlikely event that your observing session begins with your telescope’s mirror matched to the ambient air temperature, unless it can keep up with the cooling air, you’ll have thermal problems. To avoid that situation, you’re almost certainly going to have to supplement passive efforts with active measures. In other words, you’re going to need a fan.
Fanning the Flames
The simplest and most effective means of achieving and maintaining thermal equilibrium is to use a 12-volt DC computer fan. They’re inexpensive and can be purchased from most electronics stores (such as Radio Shack or Mouser) both locally and on-line. Even Amazon.com has a good selection. But how big a fan do you need, and where should it go?
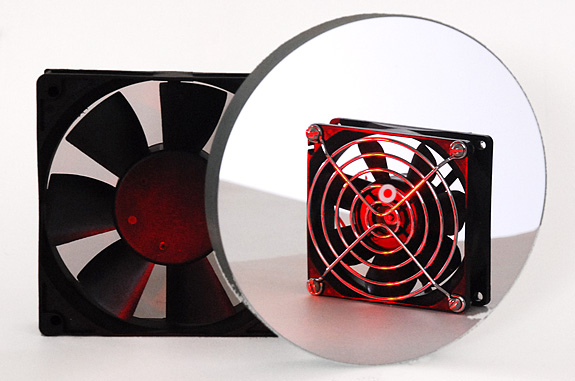
I use a 4-inch diameter 12-volt computer fan to cool the primary mirror of my 12¾-inch Dobsonian.
Let’s deal with the second issue first. The best location for a cooling fan is directly behind the telescope’s primary mirror. That’s the easiest place to mount it, and it’s also where it’s least likely to introduce image-harming vibrations. Chances are that if your telescope has anything like a standard mirror cell, there will be several mounting options.
Alan Adler popularized the idea of a side mounted fan that blows across the face of the mirror. He arrived at this configuration mainly because the flex-mirror telescope he built doesn’t allow access to the mirror’s rear surface. But his method does work for regular Newtonians too, though you have to cut a hole in the side of the tube for the fan in addition to several ventilation holes on the opposite side.
So how big? You might expect that a bigger fan will push more air past your mirror, and allow it to cool faster. But that’s only true up to a point. Try to envision what’s happening. Heat is conducted from inside the mirror to its surface, where it warms the surrounding air. A fan it will blow that warm air away, but it’s replenished immediately by more air warmed by heat conducted from inside the glass to the surface. The thermal problems only go away completely when there’s no heat left inside the mirror.
But here’s the thing. Even a fairly modest fan is going to be about as effective as any fan can be. That’s because a mirror’s ability to shed heat usually isn’t limited by the power of the fan, it’s limited by the mirror’s thermal conductivity — the rate at which heat can be conducted from inside the mirror to its surface. A big, powerful fan doesn’t change that. Indeed, Bryan’s tests reveal that even for fairly large mirrors, a fan capable of pushing 20 cubic-feet per minute will do as much as any fan can. And, sadly, the thermal conductivity of the materials we typically make telescope mirrors from is about the same. There’s no free lunch, but on the other hand, it’s also true that any fan is better than no fan.
S&T graph. Data provided by Bryan Greer.
Thermal conductivity limitations have important implications for how well your telescope mirror cools. For one thing, if your mirror is thicker than 1½ inches, you should consider using fans to work both the rear and front surfaces of the mirror, which effectively doubles the cooling efficiency. Under some circumstances, mirrors thicker than 2 inches may not shed all their heat even with two fans. In general, if optimum performance is your goal, avoiding thick mirrors is virtually a necessity.
Mounting the Fan
The specifics of how you mount your fan will depend on the structure of your telescope. The trick is to avoid introducing vibration — and that’s more important than you might suspect. It takes surprisingly little vibration to rob lunar and planetary views of fine detail. Indeed, the effects can be far from obvious. I’ve seen instances where telescope owners were unaware that anything was amiss until they tried looking while switching the fan off and on.
Of course, it’s best to start with a fan that has as little vibration as possible. If you have the chance, try several and pick the one that runs smoothest. However, even a modestly rough running fan can work if it’s mounted properly. Two strategies that work well are to mount the fan with rubber bands, or capture it in place with pieces of rubbery foam. On more massive scopes, I’ve had success using squares of Velcro attached with double-sided foam tape to the fan and the mirror cell. The main thing is to mechanically decouple the fan from the scope — avoid bolting the fan directly to the telescope. There’s no point in trading one image degrading problem (thermals) for another (vibration).
Some people like to add speed controls to their fans. I personally prefer to simply switch between full power (12-volts), used during cooldown, and half power (6-volts) when everything’s equilibrated. That said, there’s no harm having the fan run at full speed all the time as long as you have the power and aren’t causing vibrations.
Another option that works well if you have access to AC power, is to use an ordinary house fan to blow air against the back of the mirror to speed up the initial cooldown. This is a particularly useful strategy if your scope is already sitting outside before the start of an observing session.
Thermal Management For All?
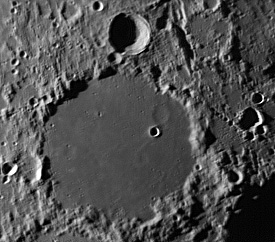
High-resolution lunar and planetary views like this one require thermal management.
Using a fan to cool your scope will take care of thermal problems, but it does involve some effort. Mounting a fan and supplying it with power isn’t a lot of work, but some will wonder if it’s worth the effort. To be truthful, for some it won’t be.
Taking care of thermals is important if you’re interested in high-resolution viewing or imaging. This is especially true if you’re into the Moon and planets. But if you mostly look at deep-sky objects at low and medium magnifications, then the benefits are less likely to seem worthwhile. And if you use a telescope with a small, thin (under ½- inch thick) mirror, adding a fan may not make a huge difference if you store your scope outside.
That said, I expect for most readers, the fairly minimal effort and expense of adding a fan will be more than worthwhile. Indeed, if you feel your observing site rarely offers good seeing conditions, you may discover the problem has been inside your telescope all along. And that’s worth knowing.
Besides minimizing thermal problems, using a fan can also help prevent your scope’s primary mirror from dewing up. This is especially relevant for truss-tube scopes. Dew forms when your mirror reaches the dew-point temperature, which is always lower than the ambient air temperature (at least in any situation in which you’d be using your telescope). So long as your mirror is at the ambient air temperature or slightly warmer, dew won’t form on its surface. Although it may seem obvious, this anti-dew benefit arises because your fan won’t cool your mirror below ambient to the dew-point temperature.
Important points to remember:
1. “Tube currents” are a symptom, not the disease. Even open (truss) tube scopes need thermal management.
2. Your scope will have thermal problems to some degree as long as the primary mirror is more than 5½°F (3°C) warmer than the ambient air temperature.
3. The thicker the mirror, the longer it will take to cool.
4. A 12-volt computer fan is the simplest and most effective way to cool your scope’s mirror.
5. Once the mirror has cooled to the ambient air temperature, continue to use a fan so that the mirror tracks the falling night temperature.
6. Just because it’s warm outside, it doesn’t mean that you don’t need to cool your mirror — it’s the temperature difference (the Delta T) that matters.
7. Ensure that your fan doesn’t introduce image-harming vibration.
8. If you mostly observe deep-sky objects at low power, you may not be bothered by thermal problems at all.
Finally, if you’re interested in learning more about this subject, or seeing some videos of thermals in action, visit Bryan Greer’s excellent web site. Bryan’s articles in Sky & Telescope (which I had the privilege of editing) really brought this issue to the attention of the majority of backyard astronomers for the first time. Much of what I have written here is based on Bryan’s detailed and careful research, for which we all owe him a debt of gratitude.
Did you find this article interesting or helpful? If so, consider using this link the next time you shop at Amazon.com. Better yet, bookmark it for future use. Thanks to Amazon’s associates program, doing so costs you nothing yet helps keep this site up and running. Thanks!