
Build this simple device for steady binocular views of the night sky.
I love binocular astronomy. At least, that’s my excuse for cluttering the house with a dozen (at last count) of these double-barreled optical wonders. Recently, my collection expanded to include particularly heavy 10×50s and inexpensive 15×70s. For the first time I really felt that I needed some kind of binocular support.
You can see so much more when you eliminate the dreaded jiggles. Obviously, the heavier the binos and the greater the magnification, the more crucial support is for optimum performance. I tried a standard camera tripod, but that turned out to literally be a pain in the neck. Since I’m too cheap to buy stuff, clearly, I was going to have to build something.
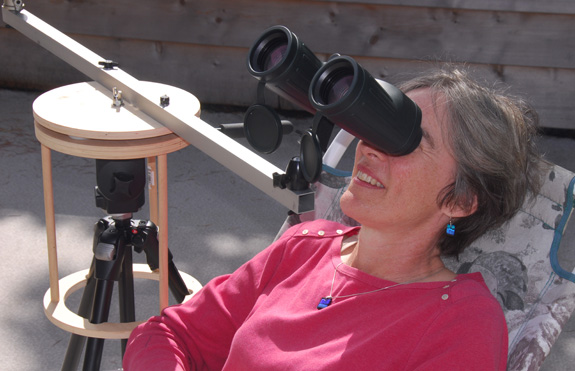
Most dedicated binocular mounts are of the parallelogram variety. Such a device works great, but its construction is complicated by including features I don’t want. All I needed was something to hold the binoculars steady while I viewed the sky from my reclining deck chair. The easy-go-round mount you see here is what I came up with.
Construction Points
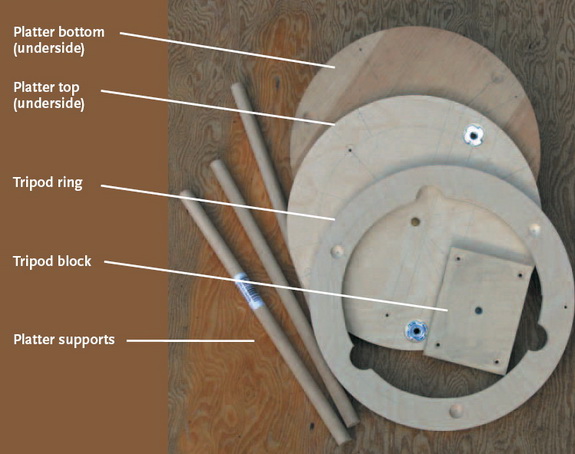
Keeping things as simple as possible was job #1. The main part of my bino mount is a platter similar to the azimuth part of a Dobsonian telescope base. The whole assembly consists of two disks, a ring, and a small block all made from plywood, three lengths of ¾-inch dowel, and a 38-inch-long piece of 1-inch square aluminum tubing. I use a readily available right-angle tripod adapter purchased from a photo store and a camera ball head to mate my binoculars to the aluminum beam.
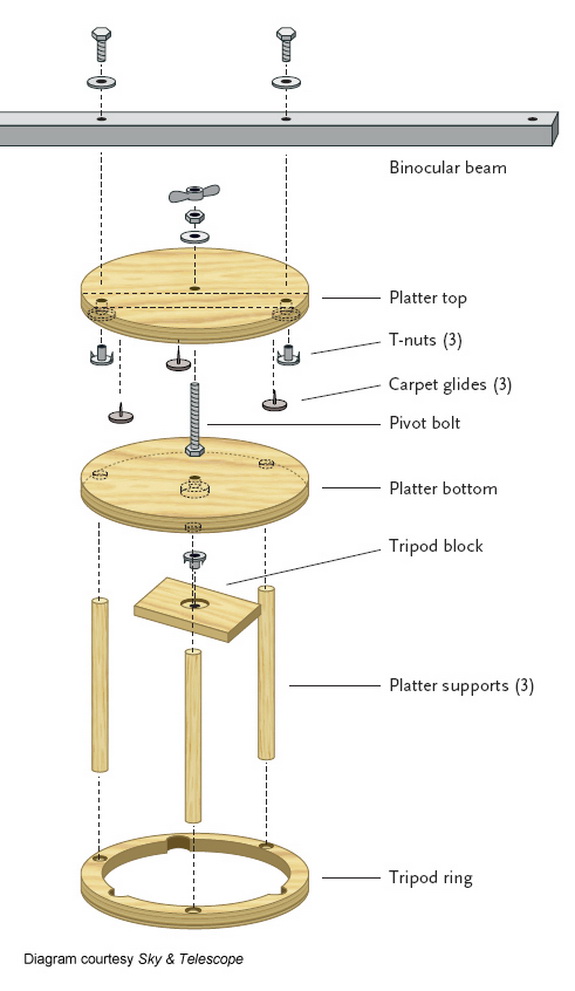
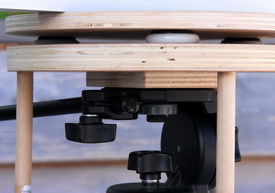
Construction begins by cutting three plywood disks of the same size. You can use ¾- or ½ -inch-thick wood — few of the dimensions in this project are critical. The diameter of the disks depends on the specifics of your camera tripod. Look at the picture at the top of the page to see why. You want to make sure that the tripod ring is big enough to rest on the legs when it’s positioned about 10 inches from the top of the tripod head. I used 9-inch-diameter disks, and I suspect that disks in the 9- to 10-inch range should work fine for most people.
The rotating platter consists of two disks joined with a pivot made of a 5/16-inch bolt. Utilizing Dobsonian technology, I placed three plastic carpet glides at 120° intervals near the underside edge of the top disk to bear against the bottom disk. Initially I was going to use some kind of Formica for this surface, but I found that the platter turned smoothly with the glides simply bearing directly against plywood.
On the underside of the platter I attached (with glue and screws) a 4-by-3-inch piece of plywood with a recessed ¼ -20 T-nut, as shown in the diagram above. This allows the platter assembly to mount on a camera tripod.
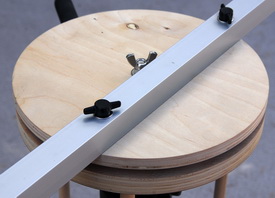
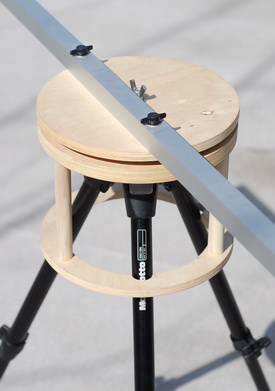
The binoculars themselves attach to an aluminum beam that bolts to the top of the platter via hand knobs threaded into matching T-nuts. Note that the beam is offset about 1¼ inches from the center of the disk to clear the pivot bolt. This offset also helps ensure that the mass of the binoculars lies along a line that passes through the pivot center. The aluminum beam needs to be long enough to prevent your shoulder from bumping into the mount when using your binoculars — about 14 inches from the edge of the platter should be about right.
The Tripod Ring
Simply attaching the platter to a tripod results in a very wobbly mount. This is where the tripod ring comes in. The idea is to offload the mass of the binoculars and the platter from the tripod head, directly to the tripod’s legs. The plywood ring slides down the legs until the spacing between the legs prevents it from going farther. Three dowels join the platter to this ring and act as supports.
To make the tripod ring, take the third plywood disk and draw two concentric circles on it. One circle has a radius ¾-inch less than the disk itself and the other circle’s radius defines the inside diameter of the ring.
Before you cut out the ring though, use a Forstner or spade bit to drill three evenly spaced holes along the circumference of this inner circle. The diameter of these holes should roughly match the diameter of your tripod’s legs.
Next, using a bit that matches the diameter of your dowels, drill three holes (again spaced at 120° intervals but offset from the first three by 60°) along the circumference of the outer circle. Don’t go all the way through the plywood because these holes will be sockets for the dowels — halfway is fine. Make a matching set of socket holes on the underside of the platter.
To complete the ring, cut out the inside of the disk. For my mount the inner ring diameter is about 7 inches. A jigsaw works fine for this cut. When done, you should have a piece that looks like the one shown above.
The final step in assembling the platter is to determine the correct length for the three dowels. To do this, slide the ring down the tripod legs until it comes to a rest and is level. Next, attach the platter to the tripod head. Now here’s the important step: raise the tripod’s center column up 1 to 1½ inches. (The reason for doing this will become apparent later.) Measure the space between the top of the tripod ring and the bottom of the platter. Add to this, the depth of the sockets on both parts, and you now have your dowel lengths. Cut to length, glue them into the sockets, and you’re done.
Using the Easy-Go-Round
To get the best stability out of this mount, attach it to your camera tripod in such a way that the tripod head carries none of the load. Here’s how I do it. First, I adjust the tripod’s center column so that it’s a good 3 or 4 inches high. I then attached the binocular mount by threading the tripod’s ¼-20 screw into the base of the platter. Next, I loosen the tripod’s altitude and azimuth locks and release the center column to let it slide down until the mount’s tripod ring is seated against the legs. (This is why you didn’t want to column all the way down when measuring the dowel lengths.) Finally, while pushing down on the binocular mount a little, I tighten all the tripod’s locks. Just like that, the mount is ready to go — just add binoculars.
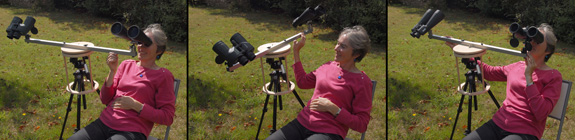
You can double your fun by mounting binoculars at both ends of the aluminum beam. As shown in this sequence, this arrangement allows you to quickly swap views between, for example, wide-angle 7 × 50s and high-powered 15 × 70s — all without leaving the comfort of your observing chair.
The easy-go-round can be used in a couple of different configurations. My favorite way is to mount two binoculars, one on either end of the aluminum beam. Usually I have my 10×50s on one end and my 15×70s on the other. The mount allows me to switch between views quickly while I remain in my chair. I find this very handy when I’m writing my Binocular Highlight column and want to be able to quickly compare the views in different binoculars. If you plan on using only one binocular, you’ll probably find that some counterweighting on the other end of the beam helps the platter turn more smoothly — especially if your binoculars are heavy.
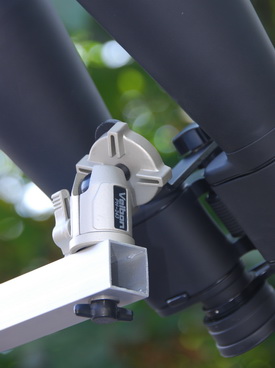
Key to the easy-go-round’s utility is the camera ball head that supports the binoculars. Although the mount moves smoothly in azimuth, the ball heads allow me to aim the binoculars over a huge swath of sky without having to adjust the mount or move my chair. I simply loosen the ball head and aim the binoculars as if I were using them hand-held. Once I’ve swept up my target, I tighten the ball head and take my hands off the binoculars for a relaxing, jiggle-free view.
To change the height of the binoculars, I can adjust the tripod legs or remount the ball heads underneath the support beam. Usually though, I can achieve all the adjustment necessary just by shifting my position in the chair.
Although I still cherish my image-stabilized binoculars for instant astronomy, the easy-go-round mount adds image stabilization to my standard binoculars and my new 15 × 70s. And I did it for a few dollars in parts and a couple of evenings of labor.
Update: I used the mount exactly as described in this article for many months, but one day discovered I could simplify the design while at the same time improve rigidity.
My tripod is a Bogen (Manfrotto) model 3001 BN. One of its nice features is that the centre column can be completely removed. I figured if I added a short column of the same diameter directly to the binocular mount, I could eliminate the tripod head altogether. This would allow me to shorten the dowel legs on the bino mount and improve rigidity too.
The “column” is simply a 1¼-inch long piece of 3/4-inch-diameter doweling with a bolt going through its centre that threads into the ¼-20 socket on the bino mount. This modification really did make the mount noticeably less “springy” and simplified setup. When I want to use the easy-go-round, all I do is remove the tripod’s centre column along with the head, slip on the bino mount, and tighten the tripod’s centre-column clamp. And just like that, I’m ready to attach the binoculars and get observing. Of course, this only works if your tripod has a removable centre column like mine does, but this is a pretty common feature in pro-level tripods.
Did you find this article interesting or helpful? If so, consider using this link the next time you shop at Amazon.com. Better yet, bookmark it for future use. Thanks to Amazon’s associates program, doing so costs you nothing yet helps keep this site up and running. Thanks!
Note: This is an updated and expanded version of an article I wrote for the December 2007 issue of Sky & Telescope magazine.