
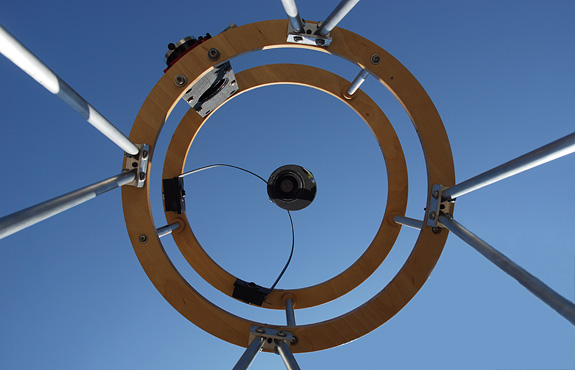
The secondary mirror holder and spider on my 12¾-inch truss-tube Dobsonian is made with scrap wood, a few nuts and bolts, and a stainless-steel ruler.
The curved-vane secondary mirror holders I use on almost all my telescopes never fails to excite curiosity. Most people know that the principal benefit of the curved spider is spike-free stars, but they often wonder if it really works. The “points” adorning bright stars in telescopes with straight-vaned spiders are diffraction artifacts that don’t seriously affect the image but do impose an aesthetic quality that may not appeal to you. Luckily, the remedy is easy to make, works like a charm, and can be retrofitted to virtually any reflector — commercial or homemade.
As I wrote in my Telescope Workshop column in the December issue of Sky&Telescope magazine, even though a curved spider does not eliminate diffraction artifacts, it does spread them out to the point where they are difficult to see even when you are viewing a bright star. The total amount of diffraction a given spider produces depends only on the area of the primary mirror’s surface that it obscures — regardless of whether the vanes are straight or curved. All other things being equal, a curved spider like the ones I make generates about the same amount of diffraction as a typical 3-vaned model. To my way of thinking, if it’s possible to get rid of the spikes without adding diffraction, why not do it?
The idea of curved-vane spiders isn’t new — the concept has been around for a long time and several designs were detailed in the May 1985 issue (page 458) of S&T. For telescopes up to 12-inch aperture, a curved spider can be a good alternative to traditional 3- or 4-vane spiders. With larger scopes, the diagonal mirror typically becomes big and heavy enough that the greater rigidity offered by conventional spiders or more robust curved ones may be required. I’ve successfully used the design described here in numerous telescopes, including my 12¾-inch. My single-curve spider has the added benefit of being simpler than the ones in the 1985 article, and therefore easier to build.
Building the Diagonal Holder
My curved-spider diagonal holder consists of nothing more than a couple of small pieces of wood, a few nuts, bolts, and washers, and a stainless-steel ruler. The total cost of construction was about $5. All the pieces are shown in the accompanying diagrams and photos. The secondary mirror is attached with double-sided foam tape (or, three dabs of silicone adhesive) to a piece of wood cut to 45°. A bolt runs through this into a second piece of wood that is attached to the curved spider with a second, shorter bolt. In spite of the design’s simplicity, the holder allows for complete adjustment of the secondary mirror’s tilt, rotation, and position with respect to the focuser. Indeed, if you find the adjustments of a typical commercial spider frustrating, I think you’ll be pleased by how straight forward the movements of this design are.
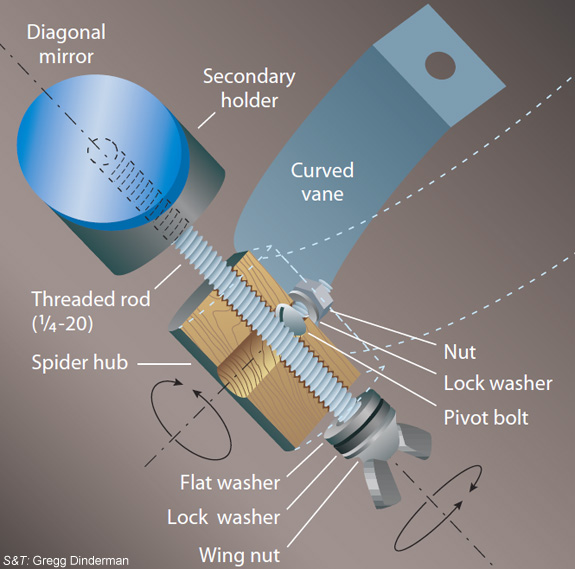
To build this holder, you begin with a few inches of wood with a diameter less than the secondary mirror’s minor axis — you don’t want your holder to add unnecessary diffraction by exceeding the size of the diagonal. I have used both round and square stock for this. Drill a 7/32-inch hole in the center for the full length and then make two cuts: one at 45° and another straight across, to yield the parts shown in the diagram above. These will become the diagonal holder (the piece cut at 45°) and spider hub. Cut or sand a ½-inch wide flat side into the hub if you are using dowling. Both pieces should be given a coat of flat-black paint.
Thread the hole in both pieces to accept a ¼-20 bolt. Use a tap if you have one; otherwise a bolt will be sufficient for putting threads in wood. Next, apply some 5-minute epoxy to the threads of the 45° piece and screw in a length of ¼-20 threaded rod or a bolt with its head cut off. (Lightweight nylon threaded rod is ideal if available.) Screw this in only to the point where it is starting to come out the hole on the 45° face — you don’t want it in contact with the back of the secondary mirror. Next, you need to carefully glue the diagonal to the holder. This is easiest to do with the mirror lying face down on clean piece of tissue. Lay some spacers down on the back of the secondary — anything about 1/16 inch thick will do, as long as they are positioned in such a way that they can be removed later. Now squeeze out three equally spaced small blobs of fresh, clear silicone adhesive onto the holder and carefully lower it onto the back of the diagonal mirror. Do your best to center the holder by eye and by feel. Let the adhesive cure for at least 24 hours.
On some of my telescopes, I use double-sided foam tape instead of silicone. However, the adhesive on the tape can fail if the wood is not clean, or if the telescope is subjected to extreme heat. It’s a good idea to attach a “safety chain,” in the form of a piece of string, to join the mirror to the holder in case the tape lets go. There are few sounds more disheartening (or costly) than the nerve-shattering clank of your secondary mirror falling onto your primary!
Check the diagram above and then take the second wooden piece (the spider hub), and drill a new hole perpendicular to the first one, in the middle of the piece. This is for the bolt that will attach the secondary mirror assembly to the curved spider vane. Make the hole slightly smaller than the diameter of the bolt you intend to use so that you can thread the bolt firmly into place. Next, enlarge a portion of this hole so that the head of the screw can pass partway through — enough to clear the diagonal holder bolt. The spider hub is now done.
The last piece of the puzzle is the curved spider. I’ve made these out of brass and steel; the type of material matters less than its thickness — you want to keep it thin to minimize diffraction effects. One common source of vane material is a stainless-steel ruler. These come in several lengths and are quite inexpensive. Such rulers are available in most office-supply stores as well as shops that carry art and drafting supplies. The one I used was a Westcott brand that was a mere 0.019-inch thick. The only preparation necessary is to peel off the cork backing and remove the residual glue with solvent.
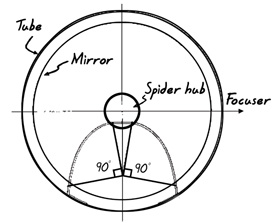
Once you have your spider vane in hand, the next step is to figure out how long it needs to be. The easiest way to do this is to make a scale drawing, like the one at right. Include the primary mirror, the inside diameter of the tube, the focuser, and the spider hub. The perfect curved spider consists of two 90° arcs that join at the hub. However, the curve need not be especially precise to eliminate diffraction spikes — as long as the vane isn’t straight, the visibility of the diffraction spikes will be reduced.
Draw the proposed vane onto the diagram and lay some string down along its profile. Measure the piece of string to get the length of the vane, and remember to add the amount needed for the “ears” where the vane meets the tube. Cut the ruler to the required length and drill three holes: one in the center to attach the spider hub, and one at either end of the vane for attaching to the tube. Bend two ears to right angles for the attachment points, and paint the vane flat black.
Assembly and Alignment
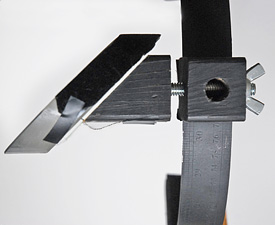
Assembly is straightforward. Simply attach the hub to the vane (make sure to use a lock washer), and then thread the secondary holder into the hub and lock into place with a wing nut. Finally, bolt the vane to the tube.
The diagonal now needs to be properly positioned. The first step is to ensure that the center of the hub (with the secondary bolt passing through it) is centered in the tube. You can adjust this with brute force — by grabbing the vane and bending, or by adding shims (washers) where the spider bolts to the tube. Generally, once this is adjusted it shouldn’t need redoing. Next, the diagonal has to be positioned directly beneath the focuser. This is accomplished by threading, or unthreading, the diagonal holder until the secondary is correctly placed. Once this position is found and the secondary is rotated into its correct orientation, lock it in place with the wing nut. Last, adjust the tilt of the secondary by allowing the hub to pivot on the bolt that attaches it to the vane. If this is set with the right amount of tension, you’ll be able to adjust the diagonal’s tilt without worrying about the secondary going out of alignment if the telescope is jarred. Now you’re all set to complete the collimation of your scope as you would normally.
If you’ve never used a telescope equipped with a curved spider, your first night under the stars will be fascinating. Aim your scope at a bright star, and marvel at the lack of diffraction spikes coming off bright stars and planets. Once you get used to the view, there will be no going back. Eventually you will grow so accustomed to the view that when you do see diffraction spikes in other scopes they will seem unnatural — which they are!
Note: This is an updated and expanded version of an article that appeared in the April 2002 issue of Sky & Telescope magazine.
Did you find this article interesting or helpful? If so, consider using this link the next time you shop at Amazon.com. Better yet, bookmark it for future use. Thanks to Amazon’s associates program, doing so costs you nothing yet helps keep this site up and running. Thanks!