
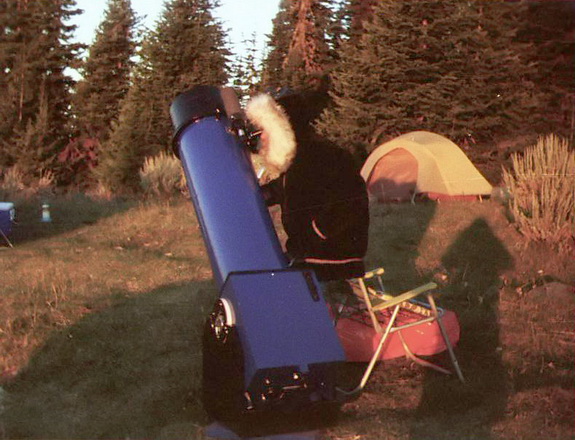
My dear fiend Lance Olkovick (a.k.a. Nanook of the North) observing Jupiter at dawn from Mt. Kobau with his 12½-inch f/5. The scope I’m building will be similar to this.
The nights are cooling down and the days becoming increasingly overcast and grey. That can mean only one thing: it’s Telescope Making Season again. And so, I’ve decided to tackle a project I’ve had in mind for some time now, namely, a rebuild of my 12¾-inch truss Dobsonian.
Day 1: The Big Idea
I built this scope a few years back for extreme portability. In its current configuration, the 12¾ is a lightweight, airline portable truss-tubed Dobsonian. I lead a star party in Costa Rica each year and this scope enables me to bring along some serious aperture. But the rest of the time, its design mostly works against it. I want something that I’ll feel comfortable leaving outside on the deck with just a tarp thrown over it. I’ll still need some level of portability, but for use around the house and on camping trips, the scope only needs to break down into pieces small enough to fit into my car.
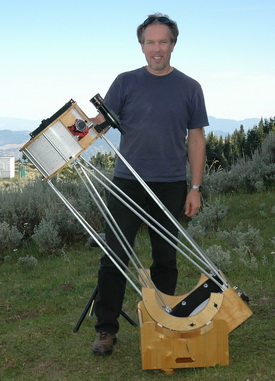
Here is my scope in its original configuration on Mt. Kobau.
Another goal was to make the scope heavier. I know, that sounds nuts — why on earth would you want a scope to be heavier? Simply because it’s been my experience that Dobsonian bearings really don’t come into their own until the telescope hits a certain mass. That “buttery smooth” feel I’m after is almost there with the telescope as it is, but I know I can get it with this rebuild.
I’ll be starting from scratch, reusing only the mirror, cell, and focuser. I’m a big believer in the one-mirror/many-scopes concept. The 12¾-inch primary I made for the truss scope turned out very well, so there just doesn’t seem any point in making another.
The scope will be an old-school, “circus-cannon” Dob, but with a twist. Ditching the truss design means it’ll come together quite quickly since I won’t have to make all kinds of fiddly little parts. It should also be cheaper to build since the main ingredients will be cardboard and plywood. Truss scopes are nice, but there’s a lot to be said for the original, basic Dobsonian design. Done properly, such a scope is sturdy, virtually indestructible, and moves like a dream.
Day 2: Making Plans
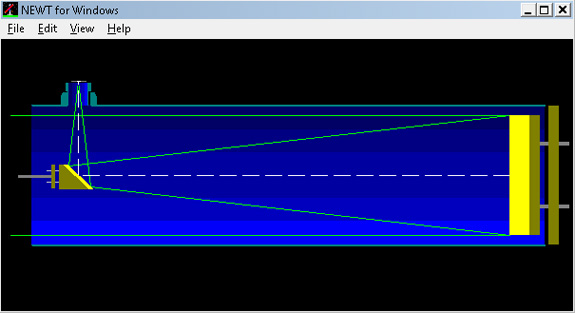
This Newt screen shot illustrates the layout of my 12¾-inch telescope.
Since this project is a rebuild, I already have rough idea of the dimensions of the main parts. Still, I thought it’d be a good idea to check everything over and make some rough drawings before getting too far along. A valuable tool for this is Dale Keller’s freeware program, Newt.
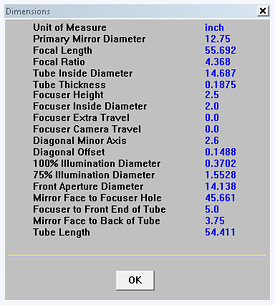
One of Newt’s most useful outputs is its table of dimensions.
Newt is very handy for dimensioning your scope — just disable the baffle feature, turn off most of the rays, and don’t use it to figure out how big your secondary mirror should be. (If you’re curious about how to do that, this is the article you should read.) You can run Newt here.
One of the most important things to realize about building a telescope is that the dimensions of all the major parts are interdependent. And because of that, you have to build them in a logical sequence. My scope will have three main parts: the upper tube assembly, the mirror box (which really is the back end of the tube), and the rocker box. So, until I have a tube in hand and know its actual diameter, I can’t finalize the dimensions of the mirror box. Likewise, without knowing the size of the mirror box and how the whole tube assembly is going to balance, I can’t design the rocker box.
The first order of business was to obtain a tube. I went looking for some 14-inch-diameter concrete-form tubing (also known by the brand name of “Sonotube”) and figured that a 14-inch should be about right for a 12¾-inch mirror. I was a bit dismayed to discover that I couldn’t find the unwaxed variety (sold as “display tubing”) that I used to get in Vancouver. It can be a real pain to get the wax off a tube so that paint will adhere, but sometimes you get lucky and it isn’t such a chore.
The second problem I had was that no one was willing to sell me less than 12 feet of the stuff. Smaller tubes? Sure, no problem — but the big ones only come only in 12-foot lengths. A back-of-envelope calculation suggested that at most I’d need only 4 feet. Given that I was going the cardboard-tube route partly to save money, having to buy three times as much as I needed wasn’t a promising start!
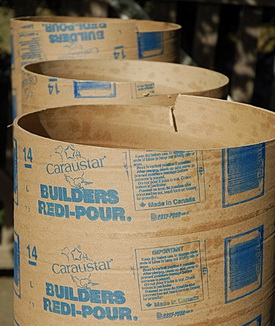
Tubes aplenty!
At the building supply store I found that 14-inch tubing isn’t exactly 14-inches inside diameter. That much was obvious when I noticed that they stored like-sized tubes one inside another. Hmmm. (I guess guys who pour concrete into these things don’t care if their columns come out a particular diameter.) Out came my trusty tape measure and I selected a tube that was a little bigger than 14 inches. I had the guys at the store cut the tube into 4-foot lengths so I could fit it into my car. Luckily there was plenty of room for error since accuracy wasn’t their thing.
Once home I picked the best looking piece and carefully measured its inside and outside diameters, which came out to 14-11/16 and 15-1/16 respectively. Actually, the tube was slightly out of round (as they tend to be) so those dimensions are the average measured across two diameters, 90° apart. With the tube dimensions in hand, I was now able to rough out the particulars of the mirror box.
I wanted the mirror box to be a cube. Why? No reason other than it has to be a box of some shape, and I just thought a cube would look tidy. The other decision I made at this point was to go with ¾-inch-thick plywood. I could use ½-inch (which is what I used for the truss-tube version), but I wanted the extra weight at the back end to make balancing the scope easier. If there’s one truism that holds with all Dobsonians, it’s that there’s never enough weight at the back end of your scope and always too much at the front. Besides, the additional thickness will make the scope extra sturdy. So, ¾-inch plywood it is.
Putting all this together, I came up with a mirror box that will be a 16½-inch cube. The cube’s inside dimension is 15 inches, which is close to the tube’s inside diameter. And with this I was able to plug numbers into Newt to get the rest of my dimensions.
Day 3: Rough Sketches
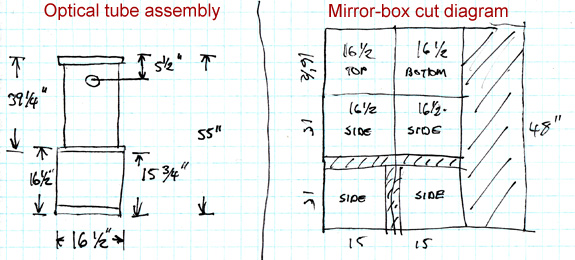
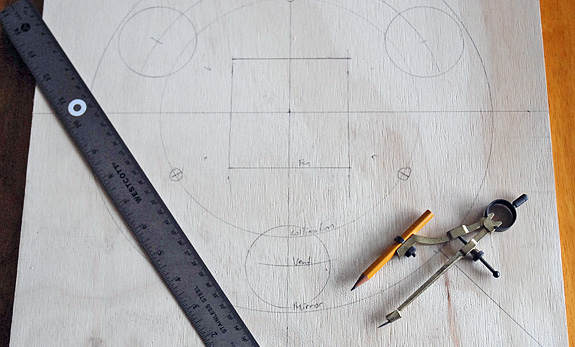
A few minutes sketching out the scope can save a lot of time in the workshop.
Whenever one of my telescopes is featured in Sky&Telescope or elsewhere, someone always asks for plans. Unfortunately, I’m just not organized enough to produce a set of plans. In truth, unless you’re building exactly the same scope with exactly the same components, detailed plans will probably create as many problems as they solve. The nearest I come is some rough, hand drawn sketches that I work up before it’s time to cut parts. And for that, they’re crucial. They also serve as an important reality check.
The golden rule for building stuff is “measure twice, cut once.” Before I head to the workshop, I take the time to think about how the parts go together — and I mean really think about it. Although I’m always anxious to get started, experience has taught me to go through the mental exercise of imagining how the parts relate to each other, and then draw what I think needs to happen. Once I have something on paper, it makes it much easier to double check that I haven’t made some embarrassing blunder.
For this stage of the project, I’ve made three drawings. One shows the whole tube assembly. I use that one to make sure the numbers all add up to the tube length I need. This is more a reality check than anything else. Since I’m working on the mirror box first, that’s the subject of sketch #2. This enables me to create a parts list. (A cube has six sides, so the fact that my parts list has six items on it gives me confidence!) Once I have this, I can proceed to drawing #3, which illustrates how the individual parts will come from a sheet of plywood. (Drawings 1 and 3 are shown above.) The goal here is to arrange the parts so that I minimize the number of cuts and keep waste to a minimum. For this step you can use graph paper and cut out pieces that correspond to the different parts to see how they fit on a sheet (or, half sheet, as with my mirror box) of plywood — kind of like the exercise you go through when you’re trying to decide how to arrange furniture in a new living room. Since I was only dealing with six parts, I made a bunch of dimensioned squares in Photoshop and performed this exercise in the virtual realm.
Whenever possible, you want to cut all like dimensions in a single pass. For example, in my case, I had several parts that were 16½ inches across. So, I laid them out on my diagram in a pair of 16½-inch wide strips, which I would later cut again to get the other dimensions. The advantage of this approach is that if I’m slightly off from my target width, at least I’ll be off by the same amount with all the parts and still have some chance at having everything fit together reasonably well.
With these three pieces of paper in hand, I’m finally ready to start raising sawdust.
Day 4: Making the Cut(s)
The rewards of an hour spent with the table saw — five of the six pieces that will become the telescope’s mirror box.
Somehow, for all the preparation, plotting, and planning, it never feels like a telescope-making project is started until you make that first cut into a virgin slab of plywood. But first, there’s the trip to the lumberyard to choose the wood.
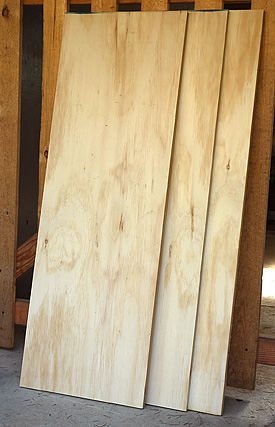
I had the lumber store make the long “rips” to my 4-foot-by-4-foot sheet of plywood.
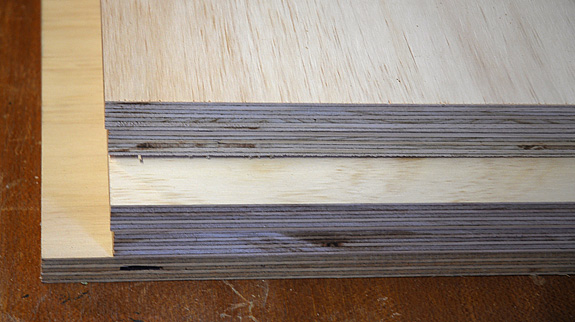
As I mentioned previously, I’ve decided to go with ¾-inch plywood on this project for the weight and rigidity. But as anyone who has ever done this before knows, there’s plywood, and then there’s plywood. Being a man of modest means, I tend to keep walking when I get to the most expensive (and nicest) material, but I also know to avoid the cheapest stuff too. The amount of time you spend filling voids and sanding low-grade wood just isn’t worth it. I usually just look at the number of plys (more is better) and the price (lower is better).
One place where preparation pays off is knowing what your cuts will be before you buy your wood. Having the cut diagram in hand meant I was able to have Rona (a Canadian hardware store chain) make the lengthwise cuts for me. They’ll actually do four cuts for free, and then charge $1/cut after that. Home Despot and most similar big-box hardware stores also offer this service. And though I have a table saw, I find it awkward (and potentially dangerous) to rip sheets of plywood with it. Better to have the store do it, especially if it’s free.
Once home, I cut the pieces for the mirror box. Astute readers will note that in the picture at the top of this section, there are only five pieces instead of the six needed. Yes, I goofed. Having violated the “measure twice, cut once” rule (and having ignored my own cut diagram), I paid the price. I found myself without a piece of plywood big enough for the mirror box top. Damn. Luckily, I can keep working without this part.
Day 5: A Bump In The Road
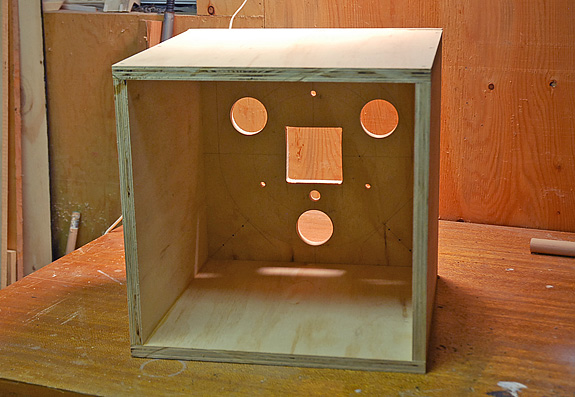
Sometimes you have to pause and solve little problems.
I don’t know about other telescope makers, but every project I’ve ever done involves some amount of head scratching and design on the fly. Even this one, which should be pretty cut and dried, has fine points that need to be sorted out before I can move ahead.
The bottom of the mirror box requires a few holes cut in it, and this is best done before the box is assembled. It needs some ventilation holes, a hole for the fan I plan on using to cool the primary mirror, and most critically, three holes for the mirror cell’s collimation bolts. A certain amount of care is needed when positioning all these, but very little thinking is involved.
What brought things to a halt temporarily is when I started wondering how I was going to attach the sling that the mirror rests on when the scope is pointed horizontally. The thing is, you need a certain amount of adjustment in the sling so that you can take up the slack once you’ve put the mirror in its cell. How do you achieve that adjustment? There are many solutions, but until I decided which way I was going to go, I didn’t know what ( if any) implications this had for the bottom of the mirror box. Would more holes be needed? How many? Where?
After spending a few evenings passively considering my options and perusing books and magazines, I decided to use a length of hardwood doweling with a hole drilled through its length to accommodate a bolt, which would then attach the doweling to the mirror box. I’ll glue one end of the sling onto the dowel, rotate it until I wind enough sling onto the dowel for the required tension, then tighten the bolt to lock it down. It’s not radical or particularly clever, but it should work.
I mention all this not because the problem or its solution are especially interesting, but to illustrate that part of the nature of telescope making is figuring out details like this as they crop up. Indeed, I find that I spend more time solving these little problems than I do actually cutting wood. But maybe that’s just me.
Day 6: Boxed In
Not exactly a work of art, but it’ll do. Once sanded and painted, it might even look decent. Not Tate Modern decent, but Dobsonian decent.
I built a box. A mirror box. And for once, it came out reasonably square. This may not sound like a great accomplishment, but it is a significant milestone on the way to completing my 12¾-inch scope.
The mirror box isn’t perfect, but it did turn out quite well. The first task was to drill all the holes in the rear piece of wood. That was easily accomplished with my drill press and my hand drill (for the holes that couldn’t be done with the drill press). I used my handy-dandy jigsaw to cut the square hole that will accommodate the scope’s cooling fan.
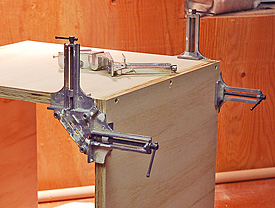
Corner clamps in action.
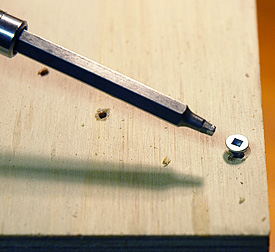
Why it’s good to be Canadian.
I have to say, I love my jigsaw. Indeed, if I were forced to have only one power tool, this would be it. It’s possible to do all the necessary wood cutting with just a jigsaw. I grant you that doing long rips would be tedious, but it could be done. The jigsaw also is capable of producing remarkably good circle cuts too — useful for the rocker box and side bearings. The jigsaw I have is like this one.
There are two other hardware items I’ll sing the praises of here. First is the humble corner clamp. Having a pair of these around was the main reason my mirror box came out square this time. It was so much easier to do the gluing and screwing with the mating parts held firmly, and accurately in position. Given they’re so cheap, yet so handy, I don’t know why didn’t get them sooner. Most hardware stores stock corner clamps, as does Amazon.com, of course.
The other goodie that makes life easier for an all-thumbs ATM like me is the wonderful Robertson-head screw. The Robertson screw is one of the main reasons it’s good to be Canadian. For some reason, these haven’t caught on in the United States. When I lived in the U.S. I had to make do with with those miserable Philips-head screws. Ugh. If you’re fortunate, you might find Robertson screws at your local specialty woodworking store. It’s worth checking. Once you’ve used Robertson screws you’ll wonder how you ever lived without them. Highly recommended.
Day 7: Initial Tube Prep

Peeling the waxy inner lining from a cardboard tube allows paint to adhere.
With the mirror box mostly assembled, it’s time to concentrate on the second part of the optical tube assembly — the concrete-form tube section. The first order of business is to remove the wax coating from the inside of the tube. After that, I can cut it to length.
Concrete-form tubes are made with a non-stick layer inside so that they work well for their intended purpose — making concrete columns. (Sometimes we ATMs forget that there’s a non-telescope use for these things!) But if you want to paint the inside of your tube (and you do), you have to get rid of this waxy layer.
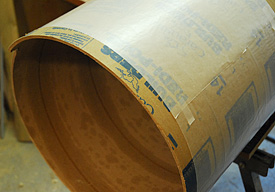
Shelving paper taped around the tube provides a cut line.
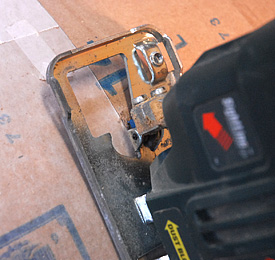
A jigsaw does a neat job of cutting cardboard tubing.
It seems that no two brands of tubing are the same. Sometimes the inside seems to be coated with a wax that penetrates deep into the cardboard, other times there’s just a thin surface layer of plastic. Luckily for me, the tube I got for this scope is of the latter kind. I found that once I got it started, the non-stick layer peeled off easily. With some tubes I’ve used, you have to peel off several layers. In any case, the key is remove as little paper as possible — you don’t want end up with a badly weakened tube.
With that task out of the way, it was time to trim the tube to the required length. Double-checking my math and running the numbers again with Newt, I came up with a figure of 40 inches. Neither end of my tube piece was in great shape, so I knew I’d have to take some material from both ends.
The trick with trimming the tube is making sure your jig saw doesn’t wander off course. The easiest way to accomplish that is with a length of shelving paper wrapped around the tube and joined end-to-end, as shown in the picture at right. (I didn’t have any shelving paper, so I used wax paper.) If the overlapping edges of the paper line up, everything is good to go. Tape the paper so that it doesn’t unravel, and add some tape to the non-cutting edge to prevent the paper from slipping down the tube. Once that’s in place, it’s a simple matter to use the edge of the paper as a guideline for the jig saw blade. And if you don’t have a jig saw, you can make this cut with a utility knife and elbow grease instead.
Jump to Week #2
Did you find this article interesting or helpful? If so, consider using this link the next time you shop at Amazon.com. Better yet, bookmark it for future use. Thanks to Amazon’s associates program, doing so costs you nothing yet helps keep this site up and running. Thanks!