
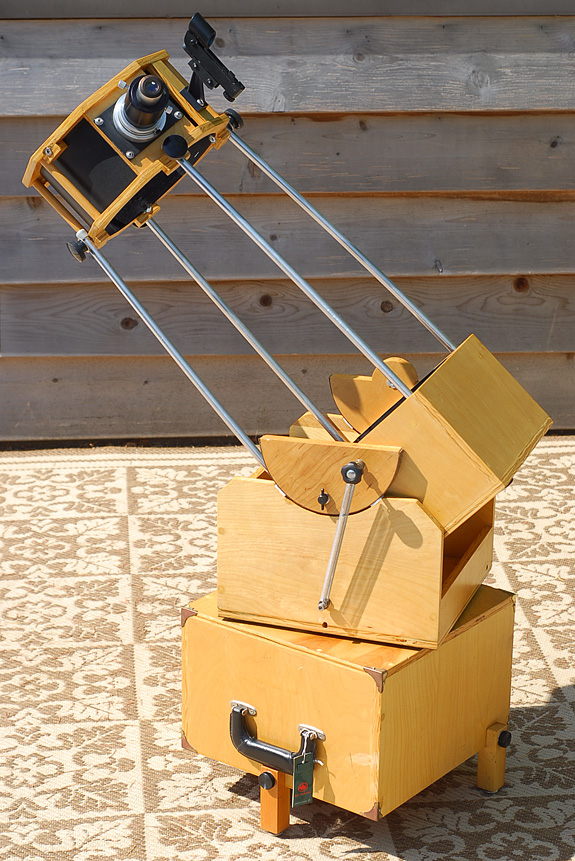
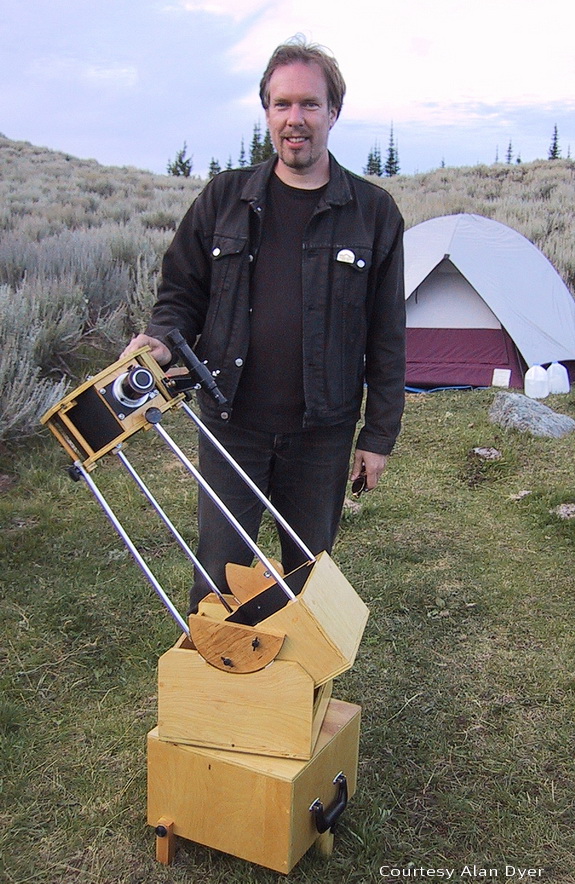
Have scope, will travel! This Dobsonian not only gives great views, it also fits into an airplane’s overhead storage compartment.
One of the best reasons for learning to build telescopes is that you can make instruments that perfectly match a particular observing need or circumstance. As an editor at Sky & Telescope, my “circumstance” happily involved a lot of travel, and as a result I found myself dreaming of a telescope that I could take with me as I zig-zagged across North America from one star party to the next. It seemed a shame to arrive under the dark skies of the Texas Star Party or Mount Kobau without a telescope of my own.
For a while, I made do with my Questar — an icon of portability but offering only 3½ inches of aperture. I felt the dark skies I was lucky enough to enjoy deserved the light grasp of at least a 6-inch scope. Initially I found a solution in simply cutting the tube of my 6-inch f/6 Newtonian in half. This way I could fit both tube halves (stuffed with my cold-weather gear and other clothing) and my lightweight German equatorial mount into one large suitcase. This configuration survived a few trips, but eventually my luck ran out, and some rough treatment by baggage handlers resulted in a crushed telescope and a return to the drawing board. I resolved that my next travelscope would have to be compact enough to go as carryon luggage.
Having seen a fair number of highly portable scopes in back issues of S&T and on the Internet, I knew I could come up with a workable scope, but I also wanted to avoid a few pitfalls. I didn’t want to relegate some major portion of the instrument as checked baggage, or make a scope that would literally be a pain in the neck to use.
Making Choices
In addition to carryon-luggage port-ability, the scope would ideally have these attributes:
• at least 6 inches of aperture, although 8 would be better;
• focuser that doesn’t come straight out the side of the tube;
• maximum and minimum eyepiece heights that allow seated viewing;
• effective baffling against stray light;
• no-tools setup.
When I sat down with a clean sheet of paper to make some preliminary sketches, all roads seemed to point to some kind of nested, truss-tube Dobsonian. After ironing out the details, I converted my 6-inch f/6 reflector to this configuration. I found not only that the design worked better than I expected, but that the finished scope was considerably smaller than the typical airline carryon allowance. This suggested the possibility of an even larger instrument utilizing the same design.
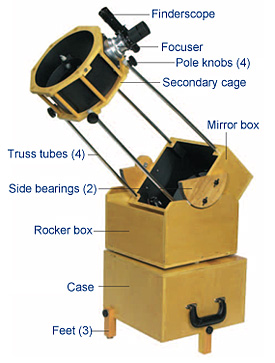
When it comes to compact truss-type Dobsonians, there are two truths that are virtually inescapable. First, the secondary cage will never be light enough, and second, the balance point will always be farther up the tube than optimal for a low-profile rocker box. Since in my case the height of the rocker box is fixed by the dimensions of the carry-on requirements, there is a limit to how far up the tube the side bearings can be positioned before the back of the tube fouls on the bottom of the rocker box. My philosophy was to do the best I could to keep the secondary cage lightweight and to move the side bearings as far up the mirror box as possible and hope for the best. If the scope turned out front-heavy, then I would have to add counterweights to the rear.
The first step in the process was to obtain a suitable primary mirror. Since the telescope would have to be compact, a short-focal-length mirror seemed in order. As it happened, I already had a ground and polished plate-glass 8-inch f/4.1 spherical mirror from another project that didn’t pan out. Although I had heard many times that figuring a fast plate-glass mirror would be a challenge, this one progressed inexplicably smoothly, and soon I had a good parabola. The majority of the figuring was accomplished with a subdiameter (4-inch) tool. As soon as the mirror was off being aluminized, I began constructing the telescope itself.
For the 8-inch travelscope, I decided to stick with the nested design that worked so well with the 6-inch version. In this configuration the secondary cage fits inside the mirror box, which goes inside the rocker box, and the whole works stores inside the case (really just another box) that also serves as an elevated ground board. Since the maximum dimensions of the package were set by the airlines, I would have to work from the outside in. I made lots of rough sketches and calculations before I began cutting wood — a measure that saved me from certain frustration and a load of mistakes. In a nested design, where the dimensions of every piece are interrelated, the importance of careful planning cannot be overstated.
Building the Components
I should mention that the telescope shown here was made by someone with very limited carpentry skills. I could not make a perfectly square box if my life depended on it. Luckily, the Dobsonian design is very forgiving. I used a drill press for most of the holes and a table saw for most of the straight cuts. However, my most-used tool was an inexpensive saber saw. The curved surfaces on the rocker box and the side bearings were cut with the saber saw and a circle-cutting jig, although these could have been done by hand. I discovered that, contrary to my expectations, the best blade for cutting circles was not the narrowest one. The skinny blades tended to splay out when the saw was cutting curves. The result was a top surface that had a slightly different radius than the bottom. The solution was to use a ½-inch-wide blade, which tended to bend far less.
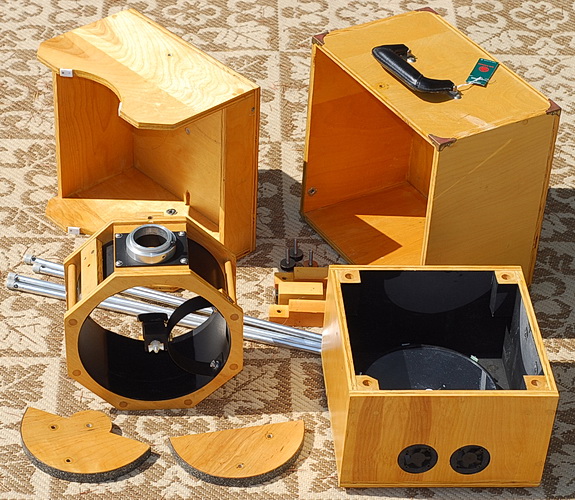
All the main parts of my 8-inch travelscope are shown here. Note the differences in the two side bearings in the foreground.
Most of the wooden pieces for my travelscope were cut from a half sheet of good-quality ½-inch plywood. All wooden pieces were finished with three coats of satin marine spar varnish. Wherever possible I used stainless-steel hardware and plastic knobs for durability and ease of assembly and adjustment. There are numerous sources for these parts — mine were purchased from Reid Tool Supply Co.
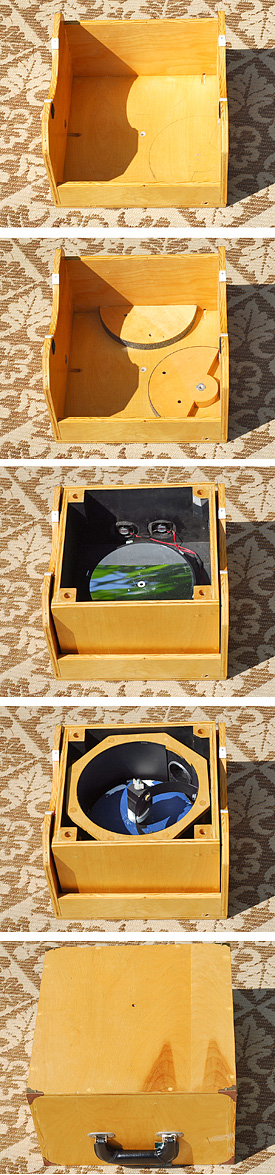
To pack the scope, I putthe mirror box inside the rocker box. Next, I place the secondary cage in the mirror box (with the mirror cover in position). Finally, the case slips over the whole lot.
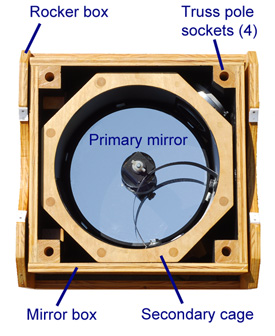
My calculations showed that for the telescope to meet carryon dimensions, the secondary cage would have to be no larger than 10⅜ by 10⅜ by 5 inches. The diameter of the primary mirror set the minimum inside diameter at 8¾ inches. The secondary cage consists of two identical octagonal pieces joined at each corner with ½-inch wood doweling. The octagon shape offers two important advantages: it provides a means of mounting the focuser at a comfortable angle (45° from horizontal), and it also ensures that the secondary cage will clear the truss-pole mounting blocks located at the inside corners of the mirror box when the scope is packed for travel.
On two sides of the octagon cage I used strips of plywood to provide a mounting location for a 2-inch low-profile helical focuser and for the finder-scope. I also added four blocks around the perimeter of the lower part of the secondary cage to provide a double thickness of wood for the T-nuts that accept the truss-pole bolts. In the front, two additional blocks were added so that the curved secondary holder could be securely attached. I used black plastic presentation folders (available at most large office-supply stores) cut to size to line the inside of the secondary cage. Once the secondary cage was completed I had accurate numbers to use in dimensioning the mirror box.
My travelscope’s mirror box is 11-9/16 square and 7 inches deep. This is big enough for the secondary cage to nest inside with about 1/16-inch clearance on all sides. Two sets of three holes are cut in the bottom to accommodate the mirror cell’s collimation bolts and for ventilation. In addition, two more holes were added for a pair of small fans that cool the primary mirror. These run off eight AA batteries and blow across the face of the mirror, ensuring that the optics cool to the ambient air temperature quickly.
Residing in the corners at the top of the mirror box are four 2½-inch lengths of 1¼-by-1¼ hardwood stock, each with a ½-inch-diameter, 2-inch-deep hole drilled lengthwise in the center. These serve as sockets for the four ½-inch diameter truss poles. There is no complex clamping system. What keeps the poles from slipping out is the fact that they are under tension — the poles have to bend inward about 1 inch to attach to the secondary cage. This scheme works remarkably well and accommodates my desire for quick and easy assembly.
The rocker box is pure Dobsonian, the dimensions of which are dictated by the size of the mirror box. The hole for the central pivot has a nylon bushing glued into place to prevent the center bolt from wearing into the wood. The top of the carry case serves as the ground board. Three legs attach to the bottom to ensure that it clears the ground and also to pro-vide a few more inches of eyepiece height.
The four “truss” poles are simply ½-inch-diameter 1/16 -inch wall-thickness aluminum stock purchased at Home Depot. (Telescopes of greater focal length, which require longer poles, would benefit from using either wider poles or more of them to ensure the necessary rigidity and freedom from vibration.) I gave them a chrome-like finish with hardware-store aluminum polish.
Calculating how long the poles should be was perhaps the most difficult step in planning the scope — I did it twice to make sure that I had the length right. It might be worth making up a set from inexpensive ½-inch wood doweling first, just to make sure you haven’t miscalculated. At ⅝ inch from the top end of each pole is a ¼-inch hole for the bolt that joins the pole to the secondary cage. To ensure that these holes would be accurately (and uniformly) placed, I made a jig out of a scrap piece of the 1¼-by-1¼ hardwood stock.
In the Field
My 8-inch travelscope goes together in about five minutes. The first step is to remove the nested pieces from the case and attach the three legs to the base. The three handknobs used for this operation are the same ones that hold the packed scope together. Next, I place the three Teflon pads on top of the case. The pads have brads hammered through them and recessed, which fit loosely into holes drilled in the top of the case. The rocker box is bolted on next by means of another handknob that threads into a T-nut in the ground board. Next the two side bearings (made from half circles of ¾-inch plywood faced with Ebony Star Formica) are attached to the mirror box with T-knobs and the mirror box is set into the rocker. The four poles slide into their respective sockets in the mirror box and the secondary cage is attached. Since each pole and socket is identical, it is not necessary to number the poles or arrange them in any particular order — another time-saving measure. The last step in assembly is to attach the finder and the battery pack for the fans. As quick as that, the scope is ready for a night of observing.
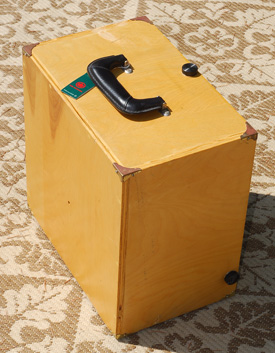
All packed up with some place to go. The only thing that doesn’t fit into the case are the four aluminum poles, which normally travel in my checked suitcase.
The maiden voyage for this telescope was to the annual Mount Kobau Star Party, held at a remote location near Osoyoos, British Columbia. Getting there from my home in Boston, Massachusetts (where I lived at the time) involved a cab rid to the airport, clearing customs and security (which resulted in more than a few curious inquiries), a 5½-hour flight across North America, and a 6-hour drive in a rental car — the last 45 minutes of which was up the bumpy unpaved road that leads to the mountaintop where the star party takes place. The scope arrived in fine shape and even after all the jostling required only a minor tweak to perfect the collimation. That night I enjoyed many wonderful views of the rich star-fields that adorn the Cygnus and Sagittarius Milky Way — all with a 22½-pound package that fits into the overhead luggage compartment of a commercial airplane.
Epilogue

One of the main problems with small Dobs is that they’re so light they often don’t have enough altitude friction. One cure is a strong spring that exerts continuous downward pressure, like the one shown here.
Since its first outing, the scope has traveled with me many times, near and far. It’s been back to Kobau several times and down to Costa Rica twice. In the years since I built it, I have made only a couple of minor changes. I added a heavier spring to increase altitude friction and used another eccentric one to allow me to use heavier eyepieces and a Paracorr. And I swapped out the original optical finderscope for a lighter, red-dot pointer. The scope’s wide field of view means that a proper finder really isn’t needed.
After the article describing this scope appeared in S&T, I received countless requests for plans. Unfortunately, there are none to be had. When I built this scope, I worked from a few sketches, but even these would be of little use to anyone else. Even I have a hard time now figuring out what they’re trying to show.
The most important thing to remember is that with a nested design like this, the dimensions of each component is determined by the part it has to fit into. So, you start with the diameter of the primary mirror. This sets the size of the secondary cage, which governs the dimensions of the mirror box, which determines the size of the rocker box, which in turn dictates the size of the case/ground board. If you build one part at a time and in sequence, you can use the actual (as opposed to planned) dimensions of the finished piece to figure out the size of the next one.
In retrospect, wish I’d done it that way myself!
Note: This is an updated and expanded version of an article I wrote for the December 2001 issue of Sky & Telescope magazine.
After a journey of 2,700 miles by plane, taxi, and rental car, I finally made it to the summit of Mt. Kobau for the first time with my travelscope. And I couldn’t be happier about it.
Did you find this article interesting or helpful? If so, consider using this link the next time you shop at Amazon.com. Better yet, bookmark it for future use. Thanks to Amazon’s associates program, doing so costs you nothing yet helps keep this site up and running. Thanks!