
I’ve been building and using telescopes for more than three decades and I’ll share with you a secret: collimating a Newtonian reflector is easy. So why does it seem so difficult when you’re just starting out? Probably because you’ve done your homework by Googling the subject and have read and re-read everything you’ve found. And now, you’re lost in a forest of information — some of it contradictory, some of it densely technical. Truly, sometimes less is more.
Many collimation guides are heavily loaded down with confusing details. Why? I’ll let you in on second secret. Most collimation instructions aren’t written with the beginner in mind. They’re written for people like me — hardcore telescope nuts interested in the minutia of how their instruments work. How do you spot overly complicated collimation advice? Here’s one fool-proof way. If step #1 is “square the focuser,” you’re in for a rough ride — guaranteed.
Collimation is a lot like routine car maintenance. It isn’t why you bought the car, but you still have to change the oil and check the tire inflation once in a while to keep the vehicle running properly. But then again, you’ll also find people whose idea of a good time is to spend a Sunday afternoon under the hood of their car. Some people just like to tinker. And if you’re a telescope nut, collimation can be a form of tinkering. But the thing to remember is that it doesn’t have to be. Most of the time your scope’s optics can be aligned in a minute or two.
So, if you’ve just purchased a telescope and have found the instructions that came with it confusing (or simply absent), read on. If you like playing with lasers and fiddling with knobs more than viewing the night sky, well, you’re probably better off reading someone else’s collimation instructions. I’m here to get you up and running with a minimum of fuss and heartache.
If you’re still with me, here we go . . .
Getting Started
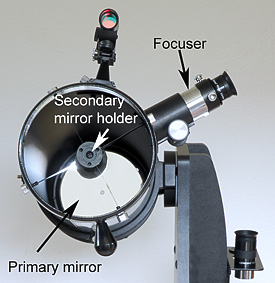
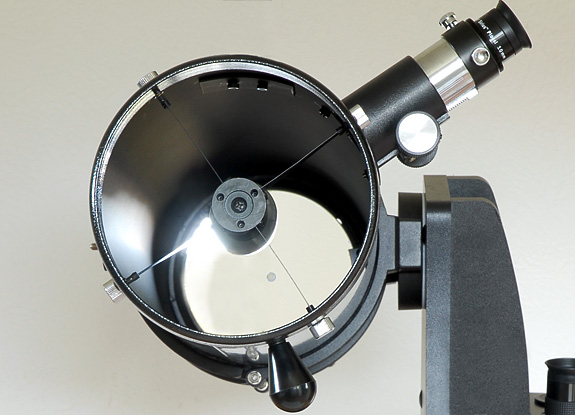
Despite your reflector telescope’s apparent complexity, it really consists of only three optical parts: the main mirror (often called the “primary mirror”), a small, flat mirror near the top of the tube (known as the “diagonal” or “secondary mirror”), and the magnifying eyepiece that you look into. And here’s the thing — only the eyepiece and the primary mirror are active optical components. The secondary is simply a flat piece of reflective glass. This will be an important thing to keep in mind later.
So what are we trying to do when we collimate our scopes? Just this: ensure that the eyepiece is aimed at the center of the primary mirror, and that the primary is aimed at the centre of the eyepiece. That’s it. End of story. Yes, it’s really that simple. This is job #1 when you align your scope’s optics. And once you know how to go about it, it’ll rarely take you more than a minute or two. Indeed, on most nights, you won’t have to do anything at all — you’ll just have to confirm that everything’s still okay.
The first thing you want to do is get yourself the right tool for the job. If you’re not sure what that might be, check out this article. In summary, you can get by with just a simple collimation cap, like the one that may have come with your telescope.
The second preliminary task is to ensure that the centre of your telescope’s primary mirror is marked in some way. Look down the front of your scope. Do you see a small paper doughnut on the mirror? If so, good. If not — you have to put one there yourself. Just follow these instructions.
So with the preliminaries out of the way, let’s roll up our sleeves and get busy. The first thing you’ll want to do is square the focuser. Just kidding! I wanted to see if you were paying attention.
Collimation is a 3-step process. Step #1 is to roughly align the primary mirror. Step #2 is to position the secondary mirror. Finally, step #3 is to fine-tune the alignment of the primary. Most nights, step #3 is the only one you’ll have to perform. And if you’re doing all this for the first time, it’s definitely best to run through it a few times in daylight — everything’s a little trickier in the dark until you’ve gained experience.
Here’s how to proceed:
Step #1: Initial collimation.
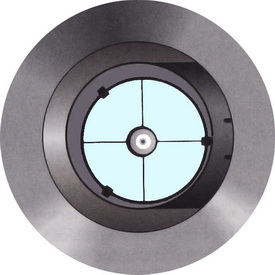
First, put your collimation cap in the focuser, have a look, and try to identify all the parts shown in the illustration below.
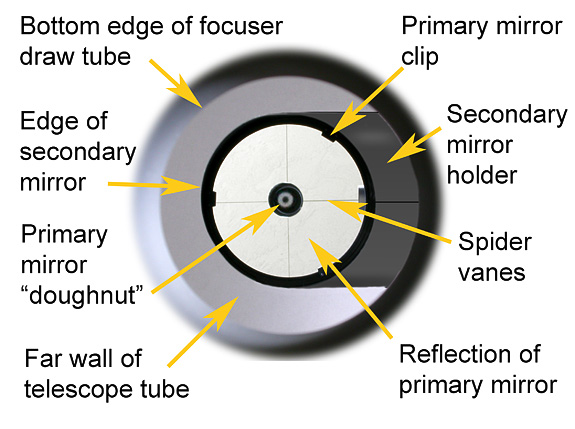
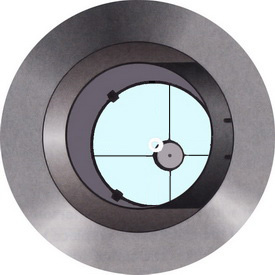
If you’re lucky, everything will look all nicely lined up, but more likely, you’ll see an arrangement resembling what’s shown in the diagram at right. Don’t worry though, by the time we’re done, your scope’s optics will match the illustration above.
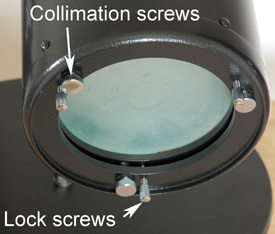
Look into your collimation cap and you’ll see its underside reflected in the primary mirror. Notice the reflection of the little hole in the collimation cap that you’re looking through — it’ll look like a small black dot on the surface of the primary mirror. What you want to do is adjust the tilt of the primary mirror by turning the collimation knobs at the back end of the scope, until that black dot is centered in the paper doughnut.
On bigger scopes, it helps to have a friend making the adjustments while you look. Another thing to keep in mind is that you should be able to get that dot centered by turning just two of the three collimation knobs — it simplifies things a bit if you’re only dealing with two adjustments.
Depending on whether or not you have help, you should be able to do this in a minute or two. You can try to imagine what each knob does, but I find trial-and-error to be the easiest approach. Turn a knob. Does it move the dot closer to the centre of the doughnut? If “yes,” do that some more. If “no,” turn the knob the other way, or try a different one. Go slowly and methodically, and eventually you’ll get there.
Step #2: Aligning the secondary mirror.
If you’ve done everything in Step #1 correctly, you might already be done. But you want to make sure that your telescope’s secondary mirror is correctly positioned too. Why? Because even if you have collimated your scope so that the eyepiece is aimed at the centre of your primary mirror and the primary is aimed at the centre of the eyepiece (which you did by performing step #1), you still want to make sure that the secondary mirror is feeding 100% of the primary mirror’s light to the eyepiece. This is where people often get lost. Don’t worry though — checking this is easier because you’ve already aligned the primary mirror.
Look in your collimation cap again, and this time only pay attention to the outer circumference of the primary mirror, and the outside edge of the secondary mirror. To make all this easier to see, tape a piece of paper to the inside of the tube, behind the secondary mirror and opposite the focuser
Is the primary centered in the secondary? It just might be fine — I’ve seen a lot of scopes arrive from the factory with the secondary mirrors correctly positioned. If not, you have to diagnose which way to move your secondary.
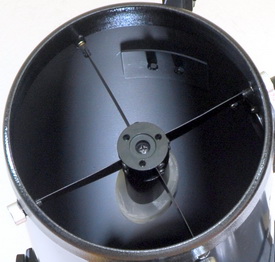
Most secondary mirror holders have a dizzying array of adjustments, and that’s why aligning that flat mirror can be so intimidating. But there are really only three motions to work with. You can move the secondary back and forth, along the length of the tube. You can rotate it with respect to the focuser. And you can change its tilt.
The first thing to do is get the back-and-forth distance correct as close as you can. Use a tape measure or ruler to measure the distance from the top of the tube to the centre of the focuser. The distance from the top of the tube to the centre of the secondary mirror should be the same. The easiest way to judge the centre of the secondary is to mark that point on back of its holder with a pencil, that way you don’t have to worry about touching the mirror itself. Loosening the big central nut or screw on the spider will allow you to make the back-and-forth adjustment. And don’t worry if you can’t get this exactly right — within a couple of millimetres is fine. If you don’t feel up to messing with this, you can probably leave it alone and assume it was correctly set at the factory.
Next, you’ll want to get the rotation about right. Simply eyeball this for now by looking down the front of the scope — you want the face of the secondary aimed at the focuser.
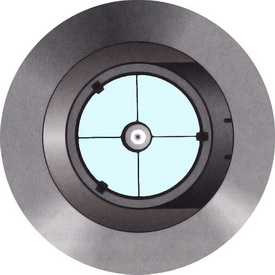
Last, you adjust the tilt until the outer edge of the primary is concentric with the outer edge of the secondary. Usually this involves a small Allen key (hex wrench) or a screwdriver. Again, if your secondary mirror holder has three adjustments (and most of them do), try working with only two. Start with the focuser racked all the way in, and as you get close to perfect, rack out until you see the edge of the primary just about touching the edge of the secondary. This little trick will help you more accurately judge the effects of your adjustments as you approach (hopefully) perfection.
It’s important to remember though that even though adjusting the secondary is the most involved part of the process, it’s also the least important. So long as you can see the whole primary reflected in the secondary, you’ll be fine. And you won’t have to mess with it very often either. Indeed, I’ve gone years without having to touch the secondary mirror in some of my telescopes. Just remember it’s just a flat piece of glass with no optical power — all it does is divert light from the primary mirror out the side of the tube.
Step #3: Re-check the primary.
If you’ve had to do a lot of fiddling with the secondary, chances are you’ll need to tweak the primary, though just a little. Use the same procedure as in Step #1.
Once you’ve completed step #3, you’re done. Go out and enjoy using your scope assured that it’s going to deliver the very best views it can.
A Brief FAQ
Why is collimation even necessary? Let’s dig into a little (and only a little, I promise) theory. If you could hold a card in front of your telescope’s primary mirror without blocking the incoming light, you’d see on that card an image reflected off the primary mirror. By moving the card towards and away from the mirror, you’ll find a position that yields the sharpest image of whatever the mirror is aimed at. That image lies on what is called the focal plane. The problem is that your telescope’s mirror produces its sharpest images at only at the centre of the focal plane. So, you want to be sure that’s the part of the image you’re magnifying with your eyepiece. If instead you aim your eyepiece slightly away from the centre of the focal plane, the image will be blurred somewhat by a nasty optical aberration called coma. The real world consequence of this situation is that you’d see less detail — Jupiter’s belts may vanish, small lunar craters will be hard to discern, double stars will blur into single points of light. Bad things. This is why you want to collimate your scope — you want to be sure you’re using the very best part of the focal plane.
What about the secondary offset? This is one of those side roads I warned you about in the introduction. If you’ve adjusted the secondary mirror so that the outer edge of the primary is concentric with it, then you’ve already done as much offsetting as you need to. In fact, strictly speaking, the secondary doesn’t really influence collimation — its positioning only affects the illumination of the focal plane. That sounds serious, but if you’ve followed the procedure outlined above, you won’t have to worry about it.
What about laser collimators? Trust me — you don’t need one. As I noted in my write-up of collimation aids, in the hands of a beginner, a laser collimator is just as likely to make things worse instead of better. Once you’ve mastered collimation with a simple collimation cap, move up to a Cheshire eyepiece if you want. And after that, if your really can’t be dissuaded, get a laser. You won’t need one, but some people find bright lights irresistible.
Do I need to tilt my focuser? This is another of those side roads that scares people off collimating their scopes. It’s a common misconception that the focuser may need to be tilted for full collimation. It doesn’t. A tilted focuser will have no effect on the image quality. (A badly tilted focuser may subtly alter the illumination pattern of the focal plane — to a degree that would be impossible to perceive visually — but that’s about it.) If you follow the procedures described above, your telescope’s optics will be perfectly aligned.
Finally, if you really want to get into the minutia of collimation (beyond simply getting your scope to deliver its best images), I’d recommend reading Nils Olof Carlin’s excellent collimation FAQ.
Did you find this article interesting or helpful? If so, consider using this link the next time you shop at Amazon.com. Better yet, bookmark it for future use. Thanks to Amazon’s associates program, doing so costs you nothing yet helps keep this site up and running. Thanks!
(Note: This article is an expanded version of the one that appeared in the September 2012 issue of Sky&Telescope magazine.)