
Requiring only a few parts, this simple and effective setup provides stable images for detailed views of the night sky.
“This is the best binocular mount I’ve ever used!” Those were the first words out of my mouth as I came indoors from testing my just-completed binocular rig.
It’s rare that I build something that actually works better than expected, but finally I’d come up with a binocular mount that provides steady views, is easy to use, very portable, and simple to build. It was a good night.
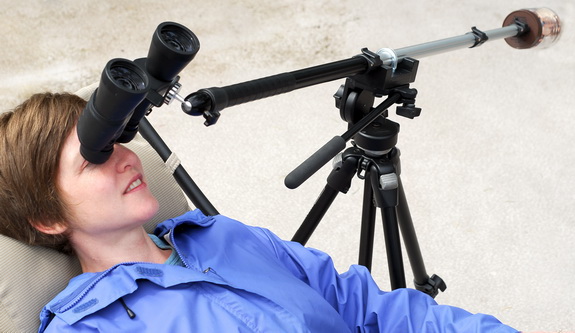
I’ve written many times about the virtues of mounted binoculars. Indeed, a good number of the objects I’ve observed over the years need steady views to be to be seen at all. I’ve used (and built) many binocular mounts, but most of them have been either expensive, bulky, or, to some extent, awkward to use. The mount shown here has none of those shortcomings and is ideally suited to observers like me who prefers to view the sky while seated or reclining in a deck chair.
The main components of my bino mount can be obtained at your local camera store, but if you’re a photographer, it’s likely you already own many of them. You’ll need a standard camera tripod with a pan/tilt head (the sturdier, the better), a ball head, and a monopod. I used an inexpensive monopod made by Slik and similar ones can be had for around $20. The ball head doesn’t need to be an expensive, heavy duty model unless your binoculars are particularly weighty. Mine is a Stroboframe FLM compact ball head, which typically retails in the $25 range. A nice feature of this unit is that a single knob locks all motions. You’ll also need a right-angle binocular-to-tripod adapter. Avoid the flimsy plastic ones that often come with budget binoculars.
The final component of my bino-mount assembly is the part you make: the bracket that mates the monopod to the tripod head. As ATM projects go, it doesn’t get much easier than this. Only a handful of hardware store parts are needed and none of the dimensions are especially critical.
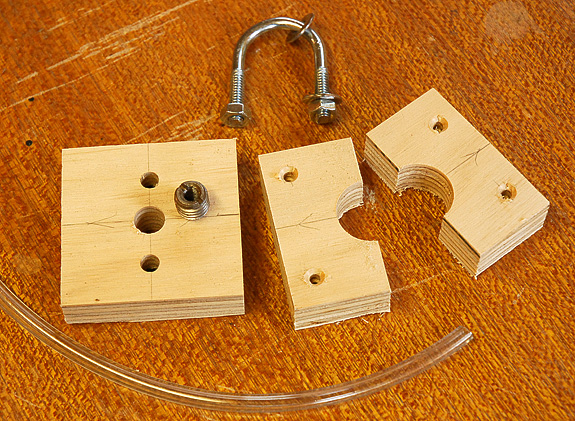
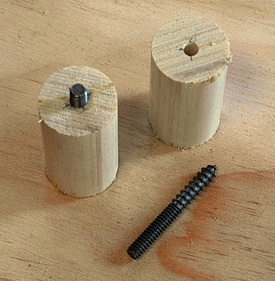
Shown here are the various pieces of the tripod mounting bracket before assembly.
You’ll need to round up a 2½-inch by 5-inch length of ¾-inch plywood, a ¼-20 threaded insert (a T-nut will also work with a minor modification), a short length of flexible plastic tubing (automotive vacuum hose works well), and a U-bolt. The size of the U-bolt will depend on the diameter of the monopod section you’re going to clamp in the bracket. I recommend using the first segment that telescopes out of the monopod’s body, which measures ¾ inches with my Slik.
Begin construction by cutting a your length of plywood in half so that you have two 2½-inch square pieces — one will be used for the mounting block, the other will form a cradle for the monopod. In the center of one piece, drill a hole that corresponds to the diameter of the monopod section to be cradled. Next, cut that piece in half and set aside.
Turning to the second plywood part, mark the center and drill the hole to accommodate the threaded insert. Screw in the insert until it’s flush with the underside of the block. Next, drill two holes for the U-bolt. Make these a bit bigger than needed to avoid having the bolt’s threads bind on the wood block. You’ll also have to enlarge these holes on the underside so that the U-bolt nuts are recessed. You’ll also probably find that the threaded sections of the U-bolt will have to be shortened with a hacksaw so that they didn’t protrude beyond the surface of the plywood. Paul Oppenheim wrote in with a helpful tip, suggesting, “thread the nuts on first! After you’ve cut the legs, gently back the nuts off the legs, and you will have repaired any thread damage the hacksawing might have caused.”
Finally, slip a short length of tubing onto the U-bolt to prevent it from marring the finish of your monopod.
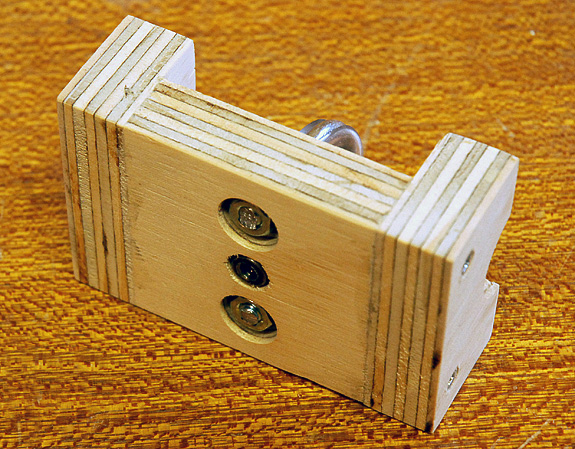
This view shows the underside of the bracket after assembly, but before painting. Note the recessed holes that accommodate the nuts for the U-bolt.
The remaining work basically consists of affixing (with wood screws and glue) the cradle halves to the mounting block, as shown in the photo above. Give the wood a waterproof finish to protect it from the elements, and let it dry. Now it’s time to assemble the mount. Begin by laying the monopod in the cradle so that the bottom of the thickest section abuts the top of the bracket. Next, slip on the U-bolt and tighten the nuts just enough that the monopod won’t rotate. Attach this to your tripod via the threaded insert, mount your binoculars, and you’re done . . . almost.
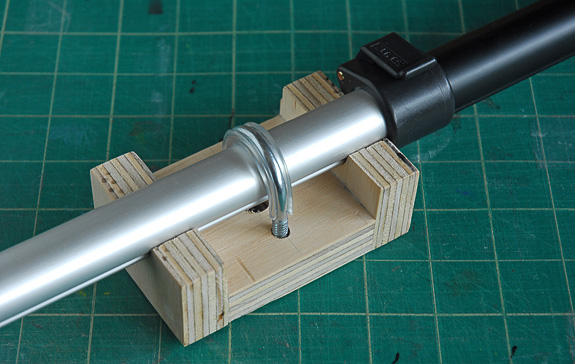
Here the mount is fully assembled before painting, just to make sure everything fits properly.
It’s likely the assembled mount will be considerably out of balance and that you’ll need to counter the weight of the binoculars. I made a counterweight from of a plastic peanut-butter jar filled with coins. I simply slide the foot of the monopod through a hole in the lid into a wooden disk in the bottom of the jar. The rubber foot of the monopod seats in a hole drilled part way through the wooden disk. A hose clamp attached to the monopod prevents the lid from sliding down. I filled the jar with all the loose change I had lying around (look under your sofa cushions if you’re a few ounces short), then screwed the jar onto the lid. The nifty thing about this counterweight is that you can adjust it by simply extending the monopod until the balance feels right.
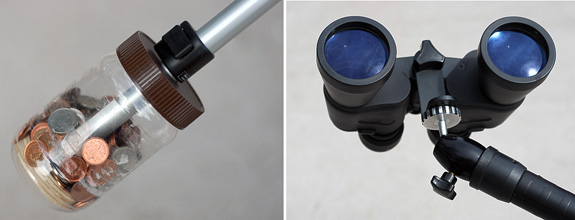
The mount’s penny-ante counterweight (left) and (right) two important purchased items: a tripod ball head and right-angle binocular adapter.
After my original article describing this mount appeared in Sky&Telescope, Richard Frederick wrote to say that he’d found a way to make the mount without having to actually build anything. Instead of making a tripod-mounting bracket, he bought a Interfit tripod clamp. (Bogen also makes a similar unit
.) So, if you’d rather spend $25 than the time it takes to make the part described above, you actually can put together my mount with off-the-shelf-parts.
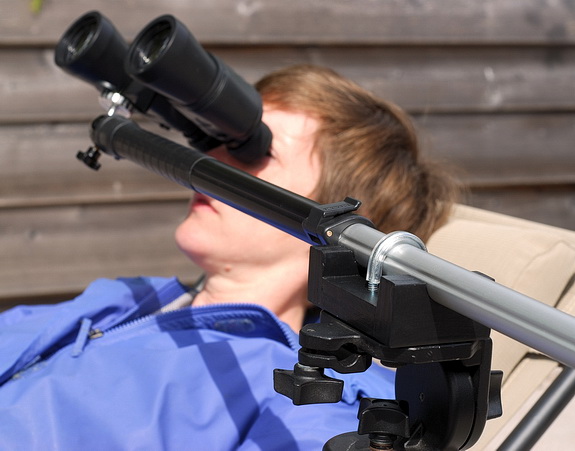
To use the bino mount, leave the tripod head lightly clamped — once you’ve adjusted the counterweight, the binoculars won’t move on their own. Loosen the ball head and aim the binoculars freehand — as if they weren’t mounted at all. Once you’ve swept up your target, lock the ball head, and enjoy the view — the binoculars will seem to float in front of your eyes. And because the motions of the mount have so many degrees of freedom, you’ll find that you can comfortably view a huge swath of sky from one position. Indeed, on most nights, I never move my lounge chair at all. By adjusting my recliner, I can scan from the horizon to the zenith and a generous amount east and west. This really is the best mount I’ve used.
Soon after completing this project, I built a second mount that dispenses with the monopod and allows me to mount two binoculars simultaneously, one at either end of a length of aluminum tubing This way I can readily compare views in my 10×50s and 15×70s, for example. With this configuration, one binocular serves as the counterweight for the other. This two-headed contraption consists of a 48-inch-long piece of 1¼-diameter aluminum tubing in place of a monopod. Into either end of the tubing, I glued a short length of 1¹̷₈ -inch-diameter hardwood doweling with a ¼-20 anchor bolt screwed into it to serve as mounting stud for the ball head. In use this bino mount works the same way as the original monopod version.
With either binocular mount you’ll have the means to get steady views of the night sky, without the expense of a commercial unit or resorting to image-stabilized binoculars. Once you’ve tried using your binos this way, you may never use them unmounted again.
Did you find this article interesting or helpful? If so, consider using this link the next time you shop at Amazon.com. Better yet, bookmark it for future use. Thanks to Amazon’s associates program, doing so costs you nothing yet helps keep this site up and running. Thanks!
(This article is an updated and expanded version of one that appeared in the August 2010 issue of Sky&Telescope)