
Binocular stargazing is full of surprises. Sometimes you stumble across a pretty cluster and wonder how you’d previously missed it. Other times, you hunt and hunt for a galaxy listed at 8th magnitude, only to come up empty handed. It’s enough to make you wonder — what makes one object a binocular standout and another difficult challenge? Compiled here are the five most important factors that determine whether or not a deep-sky wonder will turn out to be binocular trash or treasure.
#5: Aperture Rules
You’ve heard the mantra many times: aperture wins — and wins big. Certainly when it comes to telescopes, the diameter of the objective lens or mirror trumps just about every other consideration. But this maxim is true even in the binocular universe. All other things being equal, the more light gathering power your binos have, the fainter you’re going to be able to see and the more likely you’ll be able to detect elusive deep-sky objects. But all things are rarely equal.
For example, not all 10×50s are created equal — some models have better optical quality and more effective coatings than others. But one aspect that isn’t often considered is the fact that some binos don’t all make full use of their objective lenses. Indeed, one pair of cheapo 10×50s I own are functionally 10×40s. Similarly, my low-cost 15×70s are really 15×66s. What’s going on? In both cases, the internal construction and optics are choking off some of the light.
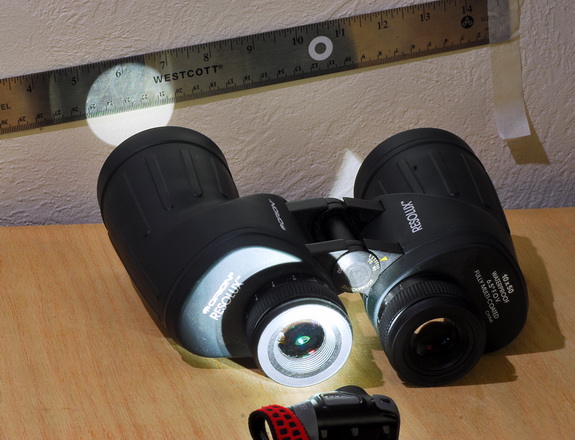
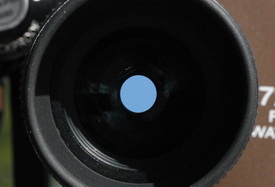
An easy way to measure the effective aperture of your binoculars is to shine a light into one of the eyepieces and measure the diameter of the emerging beam of light.
You can check to see if your binoculars are living up to specs by employing a fairly simple test. All you need do is shine a flashlight into one of the eyepieces and measure the diameter of the beam of light emerging from the objective lens, as shown in the picture above. Position the flashlight several inches behind the eyepiece so that you get a sharply defined disk of light projected onto a card or nearby wall. Measure the disk’s diameter and you’ll know within a couple of millimeters what the effective aperture of your binoculars really is. You might be surprised by what you find.
#4: Steady as She Goes
How steady you hold your binoculars has a huge impact on how much you can see — and I mean huge! Of all the factors that go into a plumbing the depths of the binocular sky, image steadiness is probably the one that is least fully appreciated. Try this experiment yourself: Look at a field of stars and note the magnitude of the faintest ones you can see (charts from the AAVSO are particularly good for this task). Now mount your binos on a tripod and look again. You’ll likely find that you’ve just gained a full magnitude, or perhaps even more.
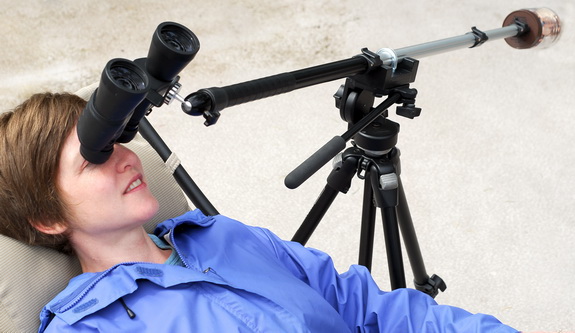
A simple, yet effective binocular mount can be made with just a few readily available camera-store items and a little ingenuity.
Steady views are the reason so many experienced observers are fans of image-stabilized binoculars. These opto-mechnical wonders yield wonderfully steady views, but without the awkward posturing, neck strain, and added encumbrance that comes with using a tripod. The downside is that image-stabilized optics cost quite a bit more than conventional binoculars and need batteries to operate. If your budget is limited, you can always build a dedicated binocular mount that will work far better than a camera tripod, as shown here.
#3: Magnification Adds Up
I have 30mm binos that outperform a 50mm pair. It’s true. My 10×30 image-stabilized binoculars actually go deeper than my budget 7×50s. Better optics and image-stabilization are part of the equation, but an even bigger factor is the greater magnification power of the 10×30s. For observers accustomed to telescope magnifications, it might be hard to imagine that 3× can make much of difference, but in the binocular universe, every little bit counts.
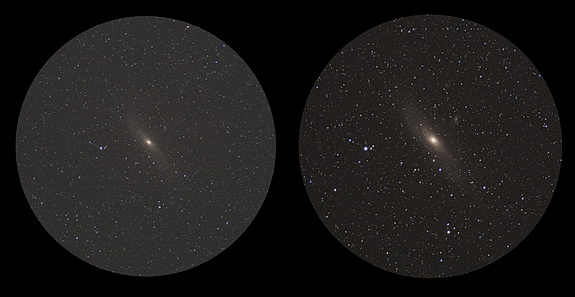
These photos of the Andromeda galaxy simulate the effects of increased magnification. In the 10×50 view (right), the galaxy is larger and the background sky appreciably darker. The 7×50s (left), however, have the advantage of providing a more expansive field of view.
To understand why, consider what magnification does to the view. First, and most obviously, it makes things appear larger. That’s important, because as more of your field of vision is occupied by a deep-sky target, the likelier it is you’re going to detect it — especially if it’s on the threshold of visibility. But at the very low magnifications found in standard binoculars, extra power plays an even more important role. Upping the power really helps distinguish small deep-sky targets from field stars. Many globular star clusters and most planetary nebulae are easy to overlook simply because they’re so tiny. Countless galaxies also fall into this category. The difference between 7× and 10× is often enough to enable you to positively identify a deep-sky object that you would have otherwise overlooked.
A second, less obvious benefit of raising the magnification is that, for a given aperture, doing so darkens the background sky, which helps make faint objects easier to see. But note the proviso, “for a given aperture.” It may be counterintuitive, but the background sky in 10×50s will be darker than in 7×50s even though both have 50mm objective lenses.
What really determines the brightness of the background sky is the diameter of a binocular’s exit pupil — the round disks that appear to float in the eyepieces when you hold the binoculars at arm’s length. Generally, the smaller the exit pupil, the darker the background sky. Exit-pupil size is calculated by dividing the diameter of the objective lens by the magnification. For example, 10×50s will have 5mm exit pupils (50/10). So, it follows that you should choose the model with the highest magnification to get the smallest exit pupil in a given binocular size. The only downside to more power is that the field of view shrinks as the magnification goes up. That’s why 15× binos are usually better choices for general observing than those featuring 18× or 20×.
#2: Bright-Sky Blues
Being able to see a particular deep-sky object depends on a complex relationship between your observing skill, your binoculars, and your skies. And of these, the latter is usually the most crucial. Sadly, for most of us, dark skies are a rare treat enjoyed only on occasional weekends or at summer star parties. And that’s too bad. Observing under pristine conditions makes binocular targets so much easier to see, even if your equipment isn’t the very best. That said, there are steps you can take to get the most of out of your backyard sky.
First, make sure that you’re sheltered from direct light sources. You might not be able to do much about the dull orange light dome overhead, but a dark-coloured T-shirt pulled over your head to block out a neighbour’s porch lights can really makes a big difference. Alternatively, if you only have to contend with lighting from one direction, a well placed tarp hung from a line or a fence can work wonders.
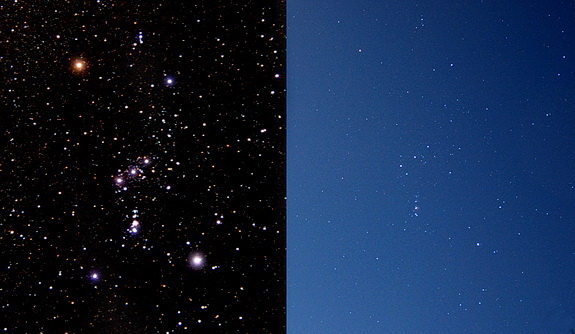
As this pair of images show, a darker sky makes it much easier to see fainter stars and deep-sky objects — with binoculars, or just your eyes alone.
Another strategy is to plan your observing sessions with a little care. If possible, make use of the pre-dawn hours when light-pollution is at its minimum. When I lived in suburban Boston, I did the majority of my observing for my Binocular Highlights column early in the morning. I was amazed by how much better conditions were then compared with just a few hours before. You can also improve matters by utilizing the first clear nights after a weather system has moved through your region. Under these conditions you normally will experience very transparent skies — and the better the transparency, the less troublesome light pollution is.
#1: Magnitude Matters
Without doubt, the most important visibility factor is how bright a deep sky object actually is. I doubt many readers will be surprised to see this at the top of the list. Really bright targets can be seen under light-polluted skies with very modest equipment, while faint ones demand darker conditions and better gear. But there’s more to magnitude than meets the eye.
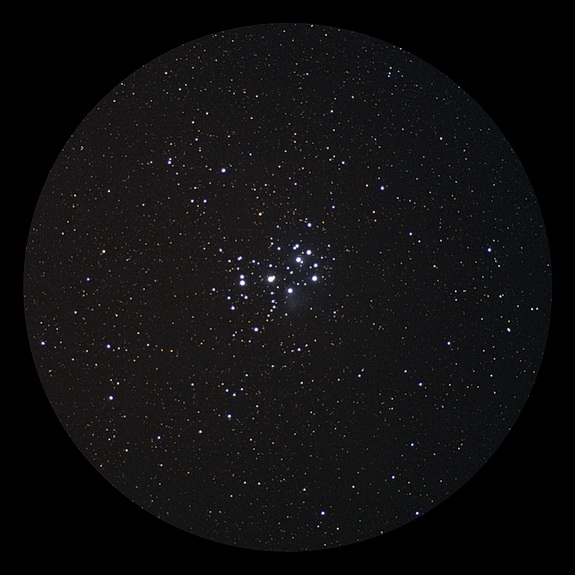
Unsurprisingly, the brighter your target, the easier it will be to see. Showpiece clusters like the Pleiades are among the finest objects for binocular viewing.
Although you can look up the brightness of any deep sky object, you have to be a little careful about treating that number as a definitive indicator of an object’s visibility. The listed magnitudes for large, extended objects (which are usually prime binocular targets) are notoriously unreliable, and often give only a ball-park indication of visibility. Take the galaxy M33, in Triangulum, for example. Most sources list it at 5.7-magnitude, which should make it a piece of cake in binoculars even under suburban skies. But here’s the rub — the galaxy’s brightness is distributed over a 71 × 42 arcminute oval, which is why it can be a tricky object under bright skies. Its surface brightness is a paltry 14.4-magnitude per square arcsecond. Now the difficulty starts to make some sense.
A related “gotcha” is that two galaxies can have the same magnitude rating, and yet one can appear quite conspicuous while the other much less so. Again — much depends on how compact the objects in question are. A small 9th magnitude galaxy can be easier to see in bright conditions than one that spans several arcminutes. A further complication arises (usually with galaxies) when magnitudes are expressed using an object’s brightness as measured in blue light (mB), rather than the more common visual magnitude (mV). The blue magnitude is typically at least a half magnitude fainter than the visual magnitude. Know which value you’re using.
What Doesn’t Matter
The five factors outlined above are the most important, but there are obviously many others to consider. For example, some equipment junkies obsess over the quality of the lens coatings. Typical binoculars have something close 10 air-to-glass surfaces, each with the possibility of rejecting 4% of the light striking it. In the worst case (no coatings at all), that could mean only 2/3 the light reaching the objective lenses make it to your eyes. But as bad as this sounds, it amounts to less than ½ -magnitude brightness drop — and that’s as bad as it gets. It’s unlikely you’ll encounter new binoculars that have no coatings at all. Coatings do matter, but they’re rarely a make-or-break factor.
Other aspects of binocular construction are occasionally treated as decisively important, but usually amount to matters of personal preference. Focuser style is one such item. Most binoculars use a convenient centre-focus control that moves the both eyepieces (or, sometimes, objective lenses) back and forth to achieve focus. Another scheme requires one to adjust each eyepiece individually. In theory, the latter approach is more robust and should help keep the optics in good alignment. In my experience though, even budget-model binos with centre-focus adjustments work reasonably well.
Prism design is another topic of frequent debate. Porro-prism models are more common than the roof-prism binos, but in practice, neither has an inherent advantage over the other. Good quality binoculars can be (and are) made utilizing either arrangement. That said, budget roof-prism binoculars lacking “phase coatings” can be noticeably inferior to similarly priced porro-prism models. But when it comes to quality binoculars, the deciding factor might be that one simply feels more comfortable in your hands than the other.
I also see a good deal of fretting (and confusion) over exit-pupil size. Some boldly state that binoculars must have 7mm exit pupils to be useful for astronomy. As the previous discussion about magnification explains, this claim is clearly nonsense.
Others argue that binoculars with exit pupils of 3mm produce views that are too dim for night-time use. Again, this doesn’t bear close scrutiny. If this were true, our telescopes would be poor astronomical instruments indeed since we routinely use them with magnifications that produce exit pupils smaller than this!
My advice when it comes to selecting binoculars for astronomy is to not worry about exit pupil size at all. Choose on the basis of aperture and magnification and you’ll do fine.
Putting It All Together

Every binocular observer’s dream to utilize the finest equipment under the most pristine, dark skies, but that’s simply not the reality for many of us. We use the gear we have and from the location that’s most convenient. And though failure can be disappointing, it’s important to remember that every time an object eludes your grasp, you have the chance to learn something about your equipment, skills, and observing conditions.
Over many years of viewing the night sky, I’ve come to realize that most of the time when I fail locate an object, it’s because I’m either not looking in exactly the right place, or my expectations are out of whack with reality. And the latter is by far more common when it comes to binocular observing. Before getting out the binoculars, check out the size and magnitude of your target, then take a moment to imagine how it should look in your binos under your sky conditions. Sometimes the answer is “very small, and very faint” — and knowing that beforehand can be the key to actually finding an elusive deep-sky wonder.
Did you find this article interesting or helpful? If so, consider using this link the next time you shop at Amazon.com. Better yet, bookmark it for future use. Thanks to Amazon’s associates program, doing so costs you nothing yet helps keep this site up and running. Thanks!
(Note: This is an updated and expanded version of an article that originally appeared in the December 2011 issue of Sky&Telescope magazine.)